Saturday 29 December 2018

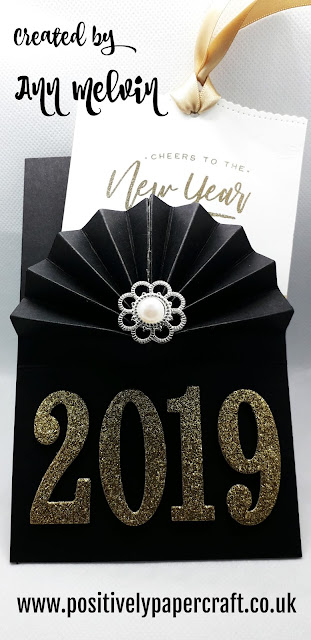
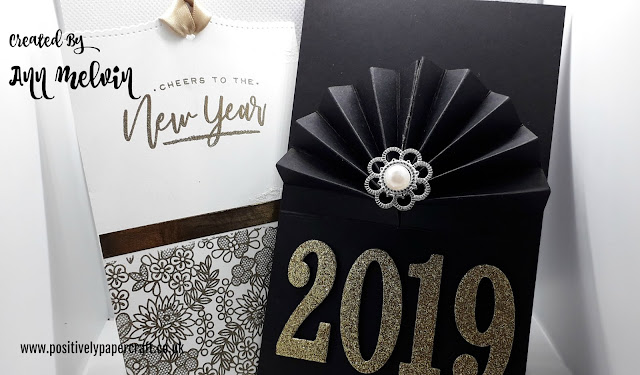
New Year Fan Card!

#positivelypapercraft, #handmadecard, #Annmelvin,


Hi Everyone,
Welcome to my Blog and as always thank you for stopping by. Well we only have a few more days left of 2018! I carn't say i am glad to see the back of it as much as i have in previous years, however i am so looking forward to 2019! I have had far worse years but i am so excited about going it 'alone' and i am hoping my monthly craft kits take off. Its certainly looking like they are going to be very popular, fingers crossed its an amazing year!

One of my new year resolutions is to stop buying so much craft stuff haha. Obviously i will still buy some but not to the extent i was. Thats one of the things that really got me about being a demonstrator, the constant buying of new products. There really is know need for it as most of it never gets used!

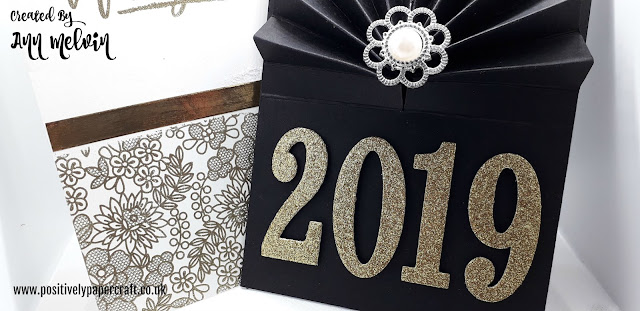
So with the new year so close i thought i would make a new years card! I am calling this a Fan card as that what it reminds me of. It really has turned out very elegant looking and i think this would make a great Handmade Wedding invitation or maybe a Christening invitation. Obviously you can change the colours etc to suit the occasion.

#fancard, #positivelypapercraft, #handmade,


For the white insert i used a beautiful stamp from SU that is now retired. Its called Something Lacey and its so beautiful!! I could not really use it before as it was not 'current' well i sure can now!! I stamped it with Versamark Ink and then heat embossed it with Gold powder, Wow its truly beautiful and really does look like real lace.

I got lots of people asking me if i would use retired items in my tutorials as obviously people have so many unused stamps and dies etc. I do have a few but when i was a demonstrator there was know point in using and keeping retired sets so i sold most of them. I will use the ones i have left in some future tutorials though.

#positivelypapercraft, #handmadecards,

I really enjoyed making this card and its just something a little different from a regular handmade card.

Please remember to check out my YouTube tutorial, i have put the link at the end of this Blog post.

I hope you all have a fantastic New Year!!!!

Love Ann xx


Thursday 27 December 2018

Very Elegant Birthday Card

#positivelypapercraft, #handmadebirthdaycard,


Hi Everyone,

Welcome to my Blog and as always, thank you for stopping by.
I hope you all had a great Christmas and got lots and lots of crafty goodies from Santa!! I got a few including a really cool Sizzix hot glue Gun and matching stand. Not that i need a new glue gun mind you, but i think all us crafters are the same. Never the less i will look forward to using it!!

Today i have a very elegant card that was not intended to be a Birthday card. My Boyfriend had asked me if i would make a Wedding Anniversary card for his Mam and Dad. I made it but did not put the sentiment on. Basically, he went home and i forgot to give him the card! Know doubt he would of had to resort to getting a 'shop' bought card!

Then i remembered that it is my Mams Birthday this Saturday, so it then turned into a Birthday Card. I love how it turned out, its so elegant and sparkly. I have know doubt that she will love it to. One thing that i love about this card is that its huge! I had some 8 x 8" card bases lying around from a few years ago so i thought i would use them.

#positivelypapercraft, #handmadecard,


The heart die that i used on the front of the card is one of my all time favourites! I purchased this from Craft Stash about 2 years ago and new that i would always find some occasion  to use it. I was on there site a few weeks ago and they had the die then. However i have just been back on today and its not there. Keep checking there site as they may just get it back in.

The paper i used is from a 12 x 12" pad called Perfect Moments. It is absolutely stunning!! The design that i used is almost like wallpaper. It has a very luxurious feel to it. I bought mine online but i have seen it for sale in The Range and Hobby Craft. I have put the link below for the paper
Perfect Moments 12 x 12" Paper Pad

The gold ribbon is a retired Stampin Up ribbon. I bought lots of it from the clearance rack earlier in the year as i love it. The Heart die was cut from Gold glitter card and i popped it up using some foam tape. I stamped Happy Birthday onto a little heart die and glued that into the middle of the big Gold heart.


As you can see from the picture above i stamped a sentiment inside the card. The 2 fancy corners are from a gorgeous die that i have in my stash. It only partially cuts out the flower so that you can pop the petals up. I thought this would be a nice touch for the inside.

I hope you like my card and if you have any questions please just drop me an email or text.

I will be back very soon with a tutorial. Thank you for looking.

Love Ann xx

Sunday 23 December 2018

Inexpensive Storage Folder For Small Dies!

Inexpensive Small Die Storage Solution! 

#diestorage, #craftroomstorage, #positivelypapercraft,

Hi Everyone,

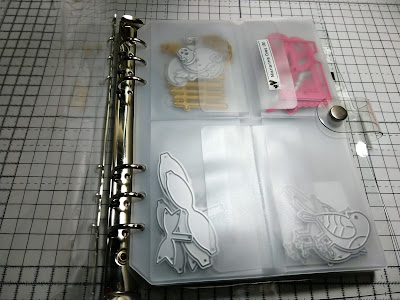
Thank you for stopping by my Blog Today. I just wanted to do a quick post about this Die storage folder that i got the other day. You may remember a Youtube video a did a little while ago about one of these folders. In case you missed it, here is the link Die Storage Video.

I mentioned in that video that i had ordered a one that had more pockets. I wanted this one to store my smaller Dies. All of my Dies are stored on Magnetic sheets but i find that storing smaller Dies that way is taking up to much room. I think this is a fantastic & inexpensive solution!! These folders only cost about £8 and the company i bought mine from ship all over the world. Here is the link if you would like to purchase one https://www.newfrog.com/product/10-sheets-diy-scrapbooking-cutting-dies-stencil-storage-book-collections-163902.01

You can purchase these folders with 1, 3, 4 or 8 compartments in one sheet so make sure you click the right option before you order.

I hope i have helped you with some craft storage options! I highly recommend these folders & they really are good quality.

I also want to take the time to wish all of my followers a very Merry Christmas! I hope you have a great time & get lots of crafty goodies in your stocking :-) I will be back next week with another tutorial.

Bye for now

Ann xx


Friday 21 December 2018

No Die Easy Tree Fold Card

Ann Melvin Independent Craft Addict/No Die Easy Tree Fold Card


Hi Everyone,

Thank you for stopping by my blog today. I think many of us always have a last minute Christmas Card to make. Today i have one that would be perfect & i am sure they will think its so cool!  As i state in the title, this card requires no fancy dies just a pencil, Ruler & some Scissors.


I decorated the front of my tree with pretty gold star gems, of course you can use whatever you have. I suppose you could even stamp or do some heat embossing on the Tree front, the choice is yours.


As you can see from the picture above, i used some Gold glitter paper to glue behind the main Tree. Again, you can use whatever you have. This was simple to do as i just drew around the Tree shape and cut it out with scissors. Twine was used to keep the card shut.

DIMENSIONS

CARD MEASURING 11 1/4" X 5 3/4"

SCORE THE LONG SIDE @ 1 1/2",  3 1/2",  7 1/2"  &  9 1/2"

WHITE CARD FOR YOUR STAMPING/MESSAGE MEASURING 3 3/4" x 5 1/2"

Please make sure to watch my YouTube Tutorial as this will give you step by step instructions of how to put this card together. You can find the link at the end of this blog post.

I really hope you like this card and will give one a try. Its really pretty simple to make. Another great thing is that you can fit this card into a normal envelope as it folds pretty much flat for postage. It also stand up perfectly so you can display it on your Fireplace etc.

Until next time.....

Love Ann xx


Wednesday 19 December 2018

Tiny Adorable Diorama Card

Ann Melvin Independent Craft Addict/Tiny Fold Flat Diorama Card


Ann Melvin #positivelypapercraft


Hi Crafter's

I am back with another project for you. I hope you like this one as much as i do! Its just so sweet. You can make them for any occasion, not just Christmas. I think these would make cute Children's cards. They really are not hard to make and i love the way they turned out.

I used a decorative Die to cut my windows in the card. You can of course use any dies you like, Circles, Squares, ovals the choice is yours. I think it would look great no matter what shape you choose.

#annmelvin, #positivelypapercraft, #cardmaking,


#dioramacard, #cardmaking, #positivelypapercraft,


To make this card you will need:

2 pieces card measuring 4" x 3 1/4"

2 pieces measuring 4 1/2" x 3 1/4"  score the long side @ 1/4" on both ends

2 pieces card measuring 1 3/4" x 3 1/4"  score both pieces on the short side @ 1/4" on both ends.

To make the snow effect ground i used some glitter cardstock and some edge dies that i have. You could also just cut the card with scissors to make a 'snow' effect.

The cute dies i used are Tim Holtz Tiny SnowGlobe dies. I bought mine from CraftStash. Here is the LINK if you wish to purchase them. They really are so cute & perfect for mini cards like these.

Please remember to check out my YouTube Tutorial for this project. I have posted the link at the end of this blog post.

As i stated in the title, the great thing is that this card folds totally flat for postage so you can fit it in a normal envelope.

I hope you have enjoyed my project for today. I will be back again on Friday with another!!

Love Ann xx


Sunday 16 December 2018

Easy Shaker Style Christmas Ornaments

Ann Melvin Independent Craft Addict|Easy Shaker Style Ornament


#positivelypapercraft, #annmelvin, #diycrafts,

Hi Everyone,

I told you i would be back :-) I am so excited to bring you my first project as a 'free' Woman haha. I have lots of great tutorials coming up & i am so happy most of you are staying with me :-)

I am kicking my first project off with these really cute photo ornaments. I was shopping in B&M the other day when i came across them. They were only £2.49 for 4. You get 2 circles & 2 star shapes. They are designed to hold pictures but i wanted to decorate mine a bit more.

#positivelypapercraft, #christmasornament

They are so easy to make and you could add sequins, glitter or faux snow like i have. I picked a large bag of faux snow up from my local pound shop. You get a picture already inside the ornament, don't throw it away until you have drew round it, this will give you a template for whatever paper or card you want to put inside.

The red Truck is a stamp set that i bought from http://www.craftstash.co.uk i stamped it out using Tuxedo Black ink then i coloured it in with alcohol markers. The Trees are die cuts and the background is glitter card.

The other ornament was decorated with a cute Ginger Bread Man die.
These would make very inexpensive gifts or you could just make them for your own home. I hope you like them :-)

Please check out my YouTube tutorial which you can find listed at the end of this blog post. I will be back again next week with lots more tutorials.

Love Ann xx


Wednesday 12 December 2018

#2 December Design Team-Under The Mistletoe DSP

Ann Melvin Stampin'Up! UK Independent Demonstrator|Under The Mistletoe Designer Paper


Hi Everyone,

Welcome to my Blog & week #2 of the Happy Crafters Christmas Design Team. We have another beautiful project from the lovely Sue Bushop. You can find the link to Sues post below, please pop over & take a look.

Here is the links to Sues Post: Click here to go to Sue's Blog

I think you will agree that this card is stunning. I love it!

You can purchase the Designer Paper from my online shop UNDER THE MISTLETOE DESIGNER PAPERPAPER

Remember to use the rewards/hostess code if your order is £150 or less. 

#positivelypapercraft #stampinup,
Until next time.....

Love Ann xx

Monday 10 December 2018

Easy Acetate Tags With Metallic Edging

Ann Melvin Stampin' Up! UK Independent Demonstrator/Signs Of Santa Acetate Tags

Signs of Santa Acetate tags Ann Melvin Stampin' Up! UK Independent Demonstrator

Hi Everyone,

Welcome back to my Blog!! 
Today i have such a sweet & easy Christmas project for you. One of the things that make it so adorable is the Signs Of Santa Stamp set & matching dies from Stampin' Up! I love this set & i think it has to be one of my all time favorites!! I know i will use this year after year.

You may remember that a while back i did a swap with one of my lovely Team members (Sue Bishop) In the swap she gifted me 2 metallic markers in Gold & Silver. I also said that i had some ideas what i wanted to use them for. Well i have finally got round to using them! 

Ann Melvin Stampin' Up! UK Independent Demonstrator

Ann Melvin Stampin' Up! Independent UK Demonstrator Signs of Santa tags


I cut my tags from Acetate and ran the marker down the sides, its that simple & i think the effect is great. I used a ruler to help me make a straight line with the marker. You may already have some metallic markers at home but if not they are pretty easy to find. I am sure Sharpie make them to.

I used Stampin' Up! Stitched Shapes dies to make my tags but you can use whatever you have. I chose a square as i new it would be easy to use my ruler as a guide. 

I think these little tags are so cute and you could also make them to hang on your Tree. They don't have to be Tags at all. I hope you will give them a go and they really are very simple to make & great fun.

Please remember to use my Hostess/rewards code if you shop with me & your order comes to less than £150. This will allow me to enter you into my customer rewards club & i will send you out a FREE Stampin' Up! product. 
If you have any trouble using the code please just let me know & i will help you. My contact details are at the top of this blog. 
December hostess code Stampin' Up! Ann Melvin
I have also linked my YouTube Tutorial at the end of this post if you would like to watch it.

Until next time.....

Love Ann xx


Friday 7 December 2018

Gorgeous Triangle Star Top Gift Box

 Ann Melvin Stampin' Up! UK Independent Demonstrator/Under the mistletoe Designer Paper Star top box


#stampin up demonstrator Star top gift box tutorial


Hi Crafters,

Thank you for popping over to my Blog on this fabulous Friday!! Today i have another Festive themed project for you & i think you will like it. First off, i have to say that this is not my idea. I CASED this from one of my lovely Team members, Andrea Parr. Below you will find the link to Andrea's Blog:
http://www.craftylittleblog.com/

Andrea made this gorgeous little box earlier this year & i think its fab! It really is very quick & simple to make & to be honest its really large. You can fit loads of little gifts or treats in there for Christmas. I thought it would be a perfect festive project as the top has a 'Star' effect closure. I emphasized mine with some Silver foil card. You could use Gold or even glitter paper. The choice is yours.


To make my box i used Shaded Spruce Card, Under the Mistletoe Designer Paper, Labels to love stamp set & The everyday label punch. I just love the colours of this box.

144967 Labels to love

144668 Everyday label punch

Under the Mistletoe designer Paper 146921
You can purchase all of the items from my online shop.

Please remember to add my rewards club code to your order if you spend less than £150 (You can find the code in the sidebar on the right) This will enter you into my customer rewards club & i will send out some FREE gifts for shopping with me.

SHOP ONLINE NOW

DIMENSIONS

CARD MEASURING 8 X 11"

SCORE THE LONG SIDE @ 3 1/2",  7"  &  10 1/2"

NOTCH THE LONG SIDE TOP & BOTTOM @ 1 3/4",  5 1/4"  &  8 3/4"

SCORE THE SHORT SIDE @ 1 1/2",  5"  & 6"

3 X  DESIGNER PAPER MEASURING 3 1/4" X 3 1/4"

Please check out my Youtube tutorial, you can find the link at the end of this blog post.

Until next time......

Love Ann xx


Wednesday 5 December 2018

Easy Fold Flat Santa Gift Bag

 Ann Melvin Stampin' Up! UK Independent Demonstrator/Easy fold flat Santa Gift Bag


Fold flat santa gift bag #papercrafts, #easygiftbag,


Hi Everyone,

Thank you for stopping by my Blog today.
I am back with another cute Christmas project. This time i have a lovely fold flat Santa style gift bag. Its really easy to make & you could make them up well in advance & store them all flat until you need them.

These are just so much better than shop bought gift bags & in my opinion so much better quality to. They take know time to make & i am sure whoever you gift them to will love them!


To make my bag i used one sheet of A4 card stock ( 8 1/4" x 11 3/4") Of course if you use 12 x 12" card you could make your bag bigger. You will be surprised at how much you can fit into this sweet bag. I added a sweet sentiment from the Timeless Tidings stamp set & also a couple of Christmas Jingle bells.

DIMENSIONS

REAL RED CARD MEASURING 8 1/4" X 11 3/4"

SCORE THE LONG SIDE @ 3 1/2",  5 1/2", 9"  & 11"
PARTIAL SCORE @ 4 1/2" X 10"

SCORE THE SHORT SIDE @ 2",  3"  &  7 1/2"

BLACK CARD FOR THE BELT MEASURES 3 1/2" X 1 1/2"


Timeless tidings stamp set #Stampinupdemonstrator, #handmadegiftbag,
148936 Timeless Tidings 

Please check out my Youtube tutorial for full instructions which you can find at the end of this post.

Until next time.........

Bye for now
Love Ann xx


Year End Clear out!! Grab Some Bargains


Hi everyone,

Just a quick post to tell you about Stampin Ups year end closeout sale!! This is your chance to grab some serious bargains while you can. The sale runs from 5th December to 2nd January 2019. However the items do sell out very quickly so i would advise ordering asap!!

SHOP NOW!!


Please remember to use my Hostess/rewards code if your order is less than £150. This will allow me to enter you into my rewards club & you will receive a FREE gift from me. If your order is over £150, please do not use the code as you will earn your own rewards when you order. You will still receive a FREE gift from me.


Thank you

Love Ann xx


#1 December Design Team - Under The Mistletoe Designer Paper

Ann Melvin Stampin' Up! UK Independent Demonstrator/December Design Team Under The Mistletoe Designer paper.


#stampinupdemonstrator, #papercrafts, Shop stampin up online,
Item No; 146921


Hi Everyone,

Welcome to my Blog & a new month of Design Team projects from the Happy Crafters! This time i have decided to try something a little different. Instead of a stamp set i have chosen some Designer paper to send to the design team. I chose the gorgeous Under the Mistletoe paper. This paper stack is gorgeous! Its all double sided & 12 x 12", perfect for all your Christmas Projects.

As you know i have 2 Ladies for the Design team. Unfortunately we only have 1 Lady this month which is the lovely Sue Bishop. The other member has had to drop out due to some unfortunate events. I may also chip in with some projects if i get time.

Below you will find the link to Sue's project & Blog. Please pop over and check out what Sue has made with this beautiful designer paper!


https://suebeespapercrafts.blogspot.com/2018/12/december-1-happy-crafters-design-team.html

You can purchase any of the products i have featured in this post from my online shop. You can also ring me to place your order if you would prefer.

Thank you for stopping by & i will be back later today with my Wednesday project & YouTube video.

Until next time......

Love Ann xx

Monday 3 December 2018

DECEMBER challenge is now OPEN!!

Hi Everyone,

I am just back to let you all know that the December monthly challenge is now OPEN!!
The theme for the month is GLITZ & GLAMOUR kindly chosen by last months winner, Bernadette Taylor.

You have until the 31st December to get your entries to me. I know that Christmas is among all of that so the postal system will be all over the place. The best advice is to get your entries in asap. The winner will be announced between the 1-2nd January 2019!!

You can make anything you like as long as you follow the Glitz & Glamour theme. Please remember to put your name & full address in with your entry. You can enter from anywhere in the world & i have lots of crafty prizes up for grabs.

If you would like to enter please email me & i will give you my Address. My email is positivelypapercraft@gmail.com.

I will look forward to your entries!!

Love Ann xx

Sunday 2 December 2018

#7 Christmas Week - Very Easy Tree Fold Card & Matching Wreath!


Ann Melvin Stampin' Up! UK Independent Demonstrator/Under the Mistletoe designer paper Tree card.


Hi Everyone,

Welcome to my Blog & project #7 of my Christmas Week series. I am very sad to say that this is the last project of the series. I hope you have enjoyed it & i hope it has given you lots of ideas & inspiration. I still have lots more gorgeous Christmas projects coming over the next few weeks so make sure you stay watching! In case you missed yesterdays project #6 i have popped the link for it below:
#6 Christmas Week Easy hanging ornament

Today i have 2 lovely projects for you that really are so easy to make. I have a gorgeous and fun Christmas Tree card & also a matching wreath. You could quite easily use up your scraps to make these projects as you only require small squares of paper to make them.

#origamitutorial, #handmadecards,


To make my projects i used the gorgeous Under the Mistletoe designer paper from Stampin Up! & also the matching stamp set, Mistletoe Season. You can purchase these items from my 24hr online shop.


Clicking on the above photos will take you direct to my shop.

Please remember if you order is less than £150, please use my hostess/rewards club code. Make sure you add this to your shopping basket page in the bottom left hand corner of the screen. You will then be entered into my customer rewards club and i will send you a FREE gift for shopping with me! 

#stampinupdemonstrator, #papercrafts, #shopstampinup,


DIMENSIONS

TO MAKE THE TREE CARD YOU WILL NEED 4 PIECES OF DESIGNER PAPER MEASURING:

1 X  3 X 3"   OR    7.6 CM X 7.6 CM

1 X  2 1/2" X 2 1/2   OR   6.3 CM X 6.3 CM

1 X  2 X 2"   OR   5 CM X 5 CM

1 X  1 1/2" X 1 1/2"   OR   3.8 CM X 3.8 CM

TO MAKE THE WREATH YOU WILL NEED 7 PIECES OF DESIGNER PAPER MEASURING 
2 1/2 X 2 1/2"

Please check out my youtube tutorial for full instructions. You can find the link at the end of this blog post.

until next time.....

love Ann xx


#6 Christmas Week - Easy hanging Ornament

Ann Melvin Stampin' Up! UK Independent Demonstrator/Easy Christmas Ornament


Hi everyone,

Welcome to my blog & project #6 of my Christmas week. Today i have this really easy & beautiful hanging ornament. I was browsing through YouTube last week & came across a channel called ZIZ Craft. I saw this ornament & thought it looked so pretty.

I made mine with whisper white card & heat embossed it with silver powder. Of course you can make it with coloured card or even designer paper, the choice is yours. I do recommend a hot glue gun to attach some of this ornament together.


In case you missed yesterdays project, #5 Christmas Week Diorama card, i have popped the link down below so you can check it out.
http://www.positivelypapercraft.co.uk/2018/12/5-christmas-week-beautiful-fold-flat.html

DIMENSIONS

TO MAKE THIS ORNAMENT TO NEED 6 PIECES OF PAPER OR CARD MEASURING 3 X 3"

YOU CAN CUT THEM FROM A PIECE MEASURING 6 X 9"

Please check out my Youtube tutorial for full instructions, you can find the video at the end of this post. I have also put the link to ZIZ crafts video.

The stamp set that i used for this ornament is called Mistletoe season by Stampin Up!. You can purchase that & any other supplies from my 24hr online shop.

 Mistletoe  Season SHOP NOW


Bye for now

Love Ann xx

Saturday 1 December 2018

November Challenge Entries & WINNERS!!

Hi Everyone,

Welcome to my blog.
I am so excited today as i have the winners for my November challenge!!!! I have to tell you that this was SO hard!! I just could not pick a winner alone. I got my Daughter to help me & she also struggled! However, we did manage to pick a winner in the end & also 2 runners up. So here we go!! The WINNER IS.......................................


BERNADETTE TAYLOR!!!!!

Thank you so much for your beautiful entry, we loved it. The time & work that has gone into this project is outstanding!! I am so happy for you & your prizes will be posted asap. Bernadette will also have the pleasure of picking the theme for our December challenge!

1ST RUNNER UP IS........................................


Elizabeth Lindeman for this amazing pop up Christmas card!! Again the time & work involved in this creation is just amazing!! Every little pocket has a pop up surprise inside, we LOVE it. Thank you so much for your entry Elizabeth. Prizes will be on the way asap.


2ND RUNNER UP IS...................................


Gemma Spencer for this stunning table decoration. Thank you so much Gemma, it really is beautiful & a total work of art. Prizes on the way asap.

A huge Congrats to our 3 winners. If i could make you all winners i would!! Thank you so much to everyone who took the time to make there projects & send them into me. You are all amazing.

Below i will put the rest of the beautiful entries so you can take a look. Once Bernadette picks the theme for December you can all start sending your new entries in. I have more great prizes up for grabs.

Thank you again to everyone, i really enjoyed this challenge.


Love Ann xx

Year End Clear out!! Grab Some Bargains