Saturday, 30 November 2019

Bright Rosa Craft Kit & Fancy Fold Card Tutorial

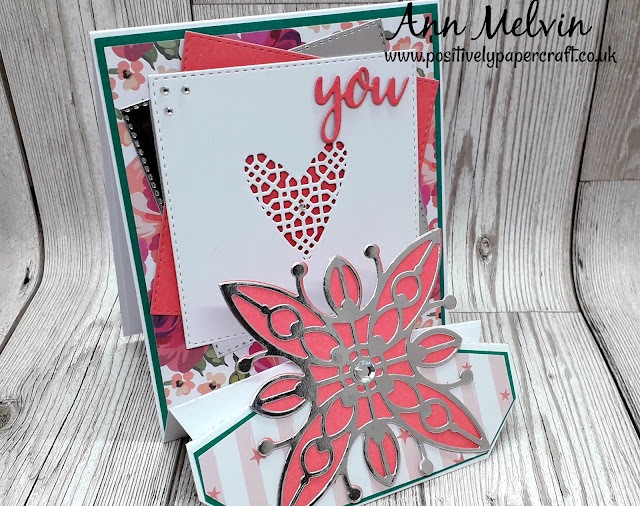
Positivelypapercraft fancy fold card


Hi Everyone,
Welcome to my Blog & as always, thank you for stopping by Today.
I am sorry this post is late, i am supposed to have a video?blog every Friday but i had so many problems with my editing software! I wasted hours uploading and then went i clicked save it was freezing all the time. So frustrating.

Yesterday i received the new monthly craft kit from Craftstash. I have to say that this one is beautiful and i think its my favourite so far! I just love the pinks and floral papers. Pink is one of my favourite colours. Also the die set you get is beautiful! It a very large flower but you also get lots of frames with it to. You can use these on so many projects.

In my video i do a full un boxing of the kit and also a tutorial on how i made a fancy fold card. I am really pleased with how it turned out and its very easy to make. Another great thing is that it folds totally flat to pop into a normal envelope.

Bright Rosa Craft Box


I hope you like it and will maybe try it out. Of course if you don't have the craft kit you can still make the card. Just use what you have:-) If you would like to get your hands on a Papercraft Society box, here is the link: Papercraft society box
As i said i think this one is my favourite box so far but the next box is also fab!! I can tell you it its by Olga Direktorenko and you also have projects ME in it! How cool is that!! I am really looking forward to seeing them in the booklet.

Please check out my Youtube video as i show you everything you get in this months box. You can find the link at the end of this post.
Until next time.....

Ann xx


Thursday, 28 November 2019

Amazing 12 x 12" Shadow Box Advent Calendar NO DIES REQUIRED!

Shadow Box Advent Calendar No Dies Needed


Hi Everyone!
Welcome to my Blog & as always, thank you so much for popping by.
I am so proud of the project i have for you today! Its my own idea & i totally love it! Its a shadow box Advent Calendar. Its very easy to make & has the same concept as the Shadow Parcel boxes tutorial i did the other day. It does take a little bit of time to make but thats just because of all the little boxes you have to make. It holds 25 & they are very roomy so you can fit other things in as well as Chocolate/Treats.

positivelypapercraft shadow box


positivelypapercraft


I made this one for my Daughter & she loves it. I put her name along the bottom which i made from some alphabet dies i had in my stash. The numbers on the front of the boxes are also made from number dies. If you don't have any number or letter dies you can maybe stamp them and heat emboss them. As the title states, you don't need any dies for this project. You can choose to decorate your calendar anyway you like.

I made my boxes from card stock and then decorated them with patterned paper. You could of course just use patterned paper to make your boxes but then they won't be as strong. It would cut down on time though. The choice is yours. If you use a nice quality thick paper it may be ok. The shadow box itself is made from 12 x 12" patterned paper & i reinforced the back with a 12 x 12" sheet of white card stock.

DIMENSIONS

FOR THE SHADOW BOX FRAME YOU NEED 4 PIECES OF PATTERNED PAPER MEASURING 12 X 4 1/2"

SCORE THE SHORT SIDE @ 1/2",  1 1/2",  2 1/2" & 3 1/2" DO THIS TO ALL 4 PIECES

YOU WILL NEED A 12 X 12" PIECE OF PATTERNED PAPER & A 12 X 12" PIECE OF CARD STOCK TO REINFORCE THE BACK.

BOXES

YOU NEED 15 BOXES MEASURING 8 1/4" X 5 3/4"
SCORE THE LONG SIDE @ 2, 4, 6 & 8"
SCORE THE SHORT SIDE @ 1/2", 2 1/2" & 4 1/2"


EACH BOX NEEDS 5 PIECES OF PATTERNED PAPER MEASURING 2 7/8" SQUARE

YOU NEED 9 BOXES MEASURING 7 3/4" x 5 3/4"
SCORE THE LONG SIDE @ 2,  3 3/4",  5 3/4"  & 7 1/2"
SCORE THE SHORT @ 1/2",  2 1/2"  &  4 1/2"

YOU NEED 4 PIECES OF PATTERNED PAPER MEASURING 2 5/8" X 2 7/8" & 1 PIECE MEASURING 2 7/8" SQUARE


YOU NEED 1 BOX MEASURING 7 1/4" X 5 3/4"
SCORE THE LONG SIDE @ 1 3/4",  3 1/2",,5 1/4"  & 7"
SCORE THE SHORT SIDE @ 1/2",  2 1/4",  &  4 1/4"

YOU NEED 4 PIECES OF PATTERNED PAPER MEASURING 1 5/8" X 1 5/8"


Please check out my video for full instructions. You can find the link below.

Bye for now

Ann xx


Monday, 25 November 2019

Unusual Shadow Box Of Gift Boxes!

Positivelypapercraft gift box tutorial


Hi Everyone,
Welcome to my Blog & thank you for stopping by!
I am quite proud of Today's project!! I think its quite unusual & for some reason it reminds me of some kind of Puzzle box! I have had it in my head for a few days now & i am so please with the end result. It turned out way better than i imagined. Its really simple to make so please don't be put off as its so easy.

Its basically a very deep shadow box that holds 4 seperate gift boxes inside. An acetate wrap finishes it off & holds it all snugly together! I love it! The large paper bow on the top of the box is a tutorial i did a couple of years ago. Again its so easy to make. Here is the link for it, EASY PAPER BOW

Positivelypapercraft


Positivelypapercraft shadow gift box tutorial


I think this would make a fantastic gift for either a Male or female. You could fill each box with lovely Gifts. For a woman you could maybe have Nail polish in one, Lipstick in the other or Jewellery etc. You could maybe even fill them with craft items or Chocolates.
Also say if you have 4 children or or giving a gift from 4 people, you could allocate a box to each person so they get a box containing a gift from someone different! Just an idea.

MEASUREMTS 

SHADOW BOX

4 PIECES CARD OR DESIGNER PAPER MEASURING 7" X 6"   OR   17.7 CM X 15.2 CM
SCORE THE SHORT SIDE @ 1/2", 2 1/2", 3 1/2" & 5 1/2"   OR   1.2 CM,  6.3 CM,  8.8 CM  &  13.9 CM
DO THIS TO ALL 4 PIECES

BOX BASE MEASURES 7 X 7"   OR   17.7 CM X 17.7 CM

BOX BACKING MEASURES 6 7/8" SQUARE   OR   17.4 CM X 17.4 CM

ACETATE WRAP MEASURES 9 X 9"   OR   22.8 CM X 22.8 CM
SCORE ALL 4 SIDES @ 2"   OR   5 CM

(YOU CAN GET AWAY WITH ACETATE MEASURING 8 1/4" SQUARE,  SCORE @ 1 5/8" ON ALL 4 SIDES) IT WONT COME AS FAR DOWN THE BOX BUT ITS STILL OK TO USE.
OR    20.9 CM & SCORE ALL 4 SIDES @ 4.1 CM

2 STRIPS OF CARD FOR THE ACETATE (TO CREATE A PARCEL WRAP EFFECT) MEASURE 1 1/2" X 9"   OR   3.8 CM X 22.8 CM

4 BOXES

4 PIECES OF CARD MEASURING 8 1/4" X 10"   OR   20.9 CM X 25.4 CM

SCORE THE LONG SIDE @ 2 3/8",  4 3/4",  7 1/8"  &  9 1/2"   OR   6 CM,  12 CM,  18 CM &  24.1 CM 

SCORE THE SHORT SIDE @ 5/8",  3" &  6"   OR    1.5 CM,  7.6 CM  &  15.2 CM

DESIGNER PAPER FOR THE BOXES
4 PIECES MEASURING 2 1/4" X 2 7/8"   OR    5.7 CM X 7.3 CM 
1 PIECE MEASURING 2 1/4" SQUARE   OR   5.7 CM 

YOU WILL NEED THESE 4 TIMES AS THERE IS 4 BOXES

I really hope you will give this box a try! I am sure you will love it.

Please make sure you stop by my Channel & Blog this Thursday as i have a great tutorial along these lines :-)

Bye for now

Ann xx


Sunday, 24 November 2019

Day 7-Christmas Week-Large Faceted Parcel Boxes

Positivelypapercraft


Hi Everyone,
Welcome to my Blog & Day 7 of my Christmas Week series. As its Day 7, sadly that means this series has come to an end :-( I hope you have enjoyed it! I have but at the same time i am very dissapointed in some of the views i got. I thought they would do better so rather dissapointed in that respect. Not sure whats going on there.
Anyway, today i have a very large faceted parcel box for you. I made this 3 years ago on my Youtube channel. It was much smaller & i always new i would get round to trying a large one sometime. This one is a really big size and you can fit loads of goodies in.

positivelypapercraft


I love the look of kraft card and white, it goes so well together. I stamped the leaves in Versamark Ink and then i heat embossed them with White embossing powder. The stamp set is a new one i purchased from Craftstash. The actual stamp set is called Ferns and its by WOODWARE. Its such a beautiful stamp set. It can be used for so many different cards and projects.

MEASUREMENTS

LARGE BOX 
2 PIECES KRAFT CARD MEASURING 10 1/2 X 8 1/4"

SCORE BOTH PIECES THE SAME ON THE LONG SIDE AT 5" & 10"
SCORE THE SHORT SIDE @ 5 1/4"

SMALLER BOX
2 PIECES OF CRAFT CARD MEASURING 8 1/2" X 8 1/4"

SCORE BOTH THE SAME AT 4" & 8" ON THE LONG SIDE 
SCORE BOTH THE SAME ON THE SHORT SIDE @ 5 1/4" 

Please check out my Youtube tutorial for full instructions.

Until next time.....

Ann xx


Saturday, 23 November 2019

Day 6- Christmas Week-Beautiful White Paper Wreath

Positivelypapercraft Christmas Wreath Tutorial


Hi Everyone
Welcome to my Blog & project Number 6 of my Christmas week. Can you believe we only have 1 more day left :-( I hope i have given you lots of ideas to make your own decorations/gifts this year. Its so much fun making your own things and you get so much satisfaction knowing that it was all hand made by you!
So today i have a very elegant White & Silver paper wreath. The base is a polystyrene ring that i picked up from my local craft shop. It measures 8" in diameter & it was only £1.50. Everything else on the wreath is just die cuts and white/silver paper & card. It looks stunning.

Positivelypapercraft Christmas Wreath

Easy handmade Christmas Wreath


Please check out my Tutorial on Youtube, it will show you how its put together and what Dies i used on the Wreath. The main one were Simply made crafts Poinsettia Dies but sadly they are still out of stock. Of course you can use any Poinsettia flowers you have. It will work just the same.

Until tomorrow

Love Ann xx


Thursday, 21 November 2019

Day 5-Christmas Week-Beautiful Light-Up Acetate Christmas Village

Acetate Christmas Village Tutorial


Hi Everyone,
Welcome to my Blog & Day 5 of my Christmas Week series. I am sorry this post is late today, i have had lots to do and just never seem to got time for this post until this evening. Anyway its here and so is this amazing Christmas project! I am so proud of this. Its so beautiful and really easy to make. You have to try one! You will love it!!

You may remember a couple of weeks back i made a small light-up Fish Tank. I think i may of mentioned in the Blog post or Video tutorial that i also had another idea for it. Well i think you can guess this is it!! I new i wanted to make some kind of contained Christmas village. To be honest, it turned out way better than i thought it would. Its sitting on my Coffee Table as we speak! It looks stunning lit up.

Acetate Christmas village box. Positivelypapercraft Tutorial


As you can see in the above picture, the roof comes off so you can turn your Tealights on and off and also replace them etc. They are hidden inside the Roof . I would imagine you could fit 3 Tealights in, i just put 2 in mine.

Positivelypapercraft Christmas Village


The fake snow i used in the box is from Hobby craft. You can pick it up on Amazon, Ebay and even places like B&M if you are in the UK. The snow i used on top of my Roof and little houses is True Snow by Aleene. Its great stuff and dries hard so really looks like snow. The little Houses and Trees i used are just cheap Dies i picked up online. If you check out my YouTube Video i have listed all the products in the description.

MEASUREMENTS 

1 PIECE OF ACETATE MEASURING 12 X 8 1/4"

SCORE THE LONG SIDE @ 1/2" , 3" ,  9"  & 11 1/2  (You can still make it with 11 3/4" acetate, your last score section will just leave you 1/4" section instead of 1/2" )

SCORE THE SHORT SIDE @ 2 1/2"

1 PIECE OF ACETATE MEASURING 8 1/4" X 6"

GLITTER CARD FOR BACK PANEL MEASURES 6" X 5 1/2"

WHITE CARD FOR THE VILLAGE BASE MEASURES 5 7/8" X 2 3/8"

CARD FOR THE LID MEASURES 
8 1/4" X 4 5/8" 
SCORE ALL 4 SIDES @ 1"

CARD FOR THE ROOF MEASURES 
8" X 6 1/4"
SCORE THE LONG SIDE @ 1",  4"  & 7"

Please check out my Youtube video. You can find the link below.

I hope you have enjoyed Today's projects. I will be back tomorrow with project 6.

Bye for now

Love
Ann xx


Day 4 Of Christmas Week-Easy Paper Cone Wreath

How to make a paper cone Wreath


Hi Everyone,
Welcome to my Blog & project number 4 of my Christmas Week. My project yesterday was those easy Paper Cone Wreath. Its a great way to use up some of those 12 x 12" papers we all hoard. You can also use 6 x 6" papers as the largest cone is 6 x 6".

Positivelypapercraft Paper cone wreath, #christmaswreath


I glued some cheap Baubles in the middle of my Wreath. I just pulled the caps off the end and then hot glued them into the middle. You could also put some Flowers or a handmade Rosette in the middle.

I really enjoyed making this. They have been around for ages and i always kept meaning to try one. So glad i did, i loved it. I am going to make another for my Mum.

To make your Wreath all you need is approx:

16 squares of 6 x 6" designer paper

14 squares 5 x 5" designer paper

9 squares of 4 x 4" designer paper.

Bye for now

Ann x


Tuesday, 19 November 2019

Day 3 Christmas Week-Easy Basket Weave Star Decoration

#positivelypapercraft #christmasdecorationweek


Hi everyone,
Welcome to my Blog & Day 3 of my Christmas series. I hope you are enjoying it so far. Sunday was a Paper Pine Cone which was popular, however yesterday was a bit of a wash out. I made a gorgeous paper Tree decoration but i take it most didn't like it as the views on my channel & Blog were terrible. I hope today is better & this project is a bit more of a hit!

Its so easy to make & one of the reasons i wanted to make it was because i was lucky enough to receive some double sided glitter card from Trimcraft. I have to say when i opened the packet i was taken back by how beautiful it is! Also the fact i have never seen double sided glitter card before. As far as i am aware, it will be available to purchase in early December. It truly is the most gorgeous glitter card i have ever seen.

It took nearly a full sheet of A4 card to make this decoration. I just cut mine on the 11 3/4" side at every 1/2". You need 20 strips and if you want to put a hanger on one like i did, you will need 21 strips. Of course you can make these with anything you like, Card stock, Designer paper, even vellum maybe. I just think they look beautiful with the glitter card from Trimcraft.

Handmade Christmas Decorations


Give one a try & you will see how easy it is & also how beautiful they are. If you make one with scrapbook paper i doubt you would need a hot glue gun. Normal wet glue would probably do it.

Please check out my Youtube tutorial, you will find the link at the end of this post. I will be back again tomorrow with project number 4.

Bye for now

Ann xx


Monday, 18 November 2019

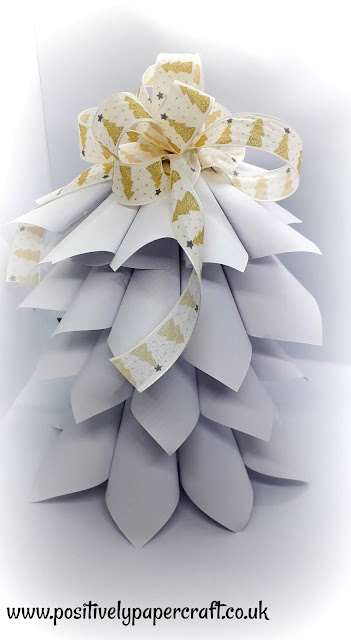
Day 2 Of Christmas Week-Easy Peasy Paper Tree Decoration

Easy paper Tree Decoration, Christmas crafts,


Hi Everyone,
Welcome to my Blog & day 2 of my Christmas week! i am so happy that you enjoyed the Paper Pine Cone Tutorial that i did yesterday. I had a great response & its lovely to know that the time & effort i put into the tutorial was very well appreciated.
Today's project is a really easy Tree decoration. Its not my idea & they are loads of different tutorials around on Youtube & pinterest. Again i have had my eyes on these Tree's since last year. I was a bit unsure about making one as i was worried it might look rubbish lol. I am glad i did one though as it looks anything but rubbish.

Christmas craft tutorial, Positivelypapercraft

You can choose to make your tree from different kinds of paper such as, wrapping paper, designer paper or white card stock like me. I am not 100% sure what gsm mine was but i think its around 200gsm. You don't want one that is to thick as you will struggle to shape it into a cone.
All you need for the core of your tree is a cardboard tube. Mine is from a Kitchen Roll but you can also use them from Wrapping paper etc. My tube measured 9". You can make your Tree bigger if you use a longer tube.

MEASUREMENTS

11 SQUARES OF CARD MEASURING 5 X 5"

22 (APPROX) SQUARES OF 4 X 4"

11 SQUARES OF 3 X 3" 

CARDBOARD TUBE MEASURING 9"

I hope you like today's project & will agree with me that its so easy & inexpensive to make. Please check out my Youtube tutorial for full instructions. As always you can find the link below.

I will be back again tomorrow with project number 3.

Bye for now

Ann xx


Sunday, 17 November 2019

Day 1 Of Christmas Week! Easy Paper Pine Cone.

Positivelypapercraft Christmas Week


Hi Everyone,
Welcome to my Blog and Day 1 of my Christmas Decoration week. I am kicking it off with a gorgeous Paper Pine Cone!! Its so easy to make, a little time consuming but its worth it. They look fantastic on your Christmas Tree. There are lots of tutorials around for these Pine Cones and i have always wanted to try one for myself. I found it very therapeutic.


Positivelypapercraft


All you need to make your Pine Cone is some 1 x 1" pieces of designer paper, Polystyrene Egg (mine was 3") Flat head pins & some dies cuts/Decorations/Ribbon to decorate the top of the Cone. You will get about 3 cones out of a 12 x 12" piece of Designer paper. I picked a large pack of Polystyrene eggs up from Ebay, you can find the link to them in the description of my Youtube video.

I really hope you will try making one of these! They really do look lovely. You can find the link for my Video at the end of this post. I will be back again tomorrow with project number 2.

Bye for now
Ann xx


Friday, 15 November 2019

Huge A4 Heat Embossed Fancy Gift Bag

Positivelypapercraft Christmas Gift bag


Hi Everyone,
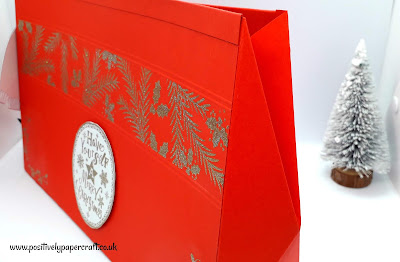
Welcome to my Blog & thank you for stopping by! Today i have a huge gift bag for you. I was inspired by a tutorial i did myself about 2/3 years ago. It was much smaller than this but the same concept. The only real difference was a die cut strip i did on the bag. With this bag being A4, a die will not fit on the bag plus you would not be able to to fit it through a machine (unless you have an A4 machine). Instead of a die i did one of my favourite craft techniques! Heat embossing! I used to do so much of this a while back & i get asked all the time if i can start doing it again in my tutorials.

Heat embossed Christmas gift bag, #positivelypapercraft


As you can see from the picture above, the bag has a really fancy fold on the sides. The smaller bag was also the same fold. I thought it would be a great idea to make a larger one. Its so easy to make and you only need 3 pieces of A4 card. I reinforced the top folds of the bag so that it hold up from being opened and closed. My bag closes with Velcro but you could also use Magnets or maybe ribbon. You could also add some handles if you wish. I hope you like it and will give it a try. I think it would be great to gift Make-Up or toiletries for Christmas.

DIMENSIONS

2 PIECES OF CARD MEASURING 8 1/4" X 11 3/4"
SCORE THE SHORT SIDE @ 1/4" & 8" DO THIS TO BOTH PIECES

2 PIECES OF CARD FOR THE SIDES MEASURING 3 1/2" X 7 3/4"
SCORE 3 SIDES @ 1/4" DO THIS TO BOTH PIECES

1 PIECE OF CARD FOR THE BASE MEASURING 3" X 11 3/4"

Please check out my Youtube tutorial, as always you can find the link to the video below.

I will be back on Sunday with my CHRISTMAS WEEK SERIES!! 7 days of back to back tutorials. I hope you will join me for them.

Bye for now

Ann xx


Thursday, 14 November 2019

Fold Flat 3D Tealight Card

fold flat card, 3D tealight card, Christmas crafts


Hi Everyone,
Today i am back with a very beautiful display card. Its so easy to make and looks great at night all lit up! I had this idea in my head and was so pleased that it worked out quite well. I am keeping this one to display on my Coffee Table. Of course you can give yours away as it folds totally flat to fit into an envelope.

Positively papercraft pop-up card

You just place your Tealight inside (Battery Operated) and it lights up the whole window. It looks so pretty. I hope you will give one a try as its so easy. You can decorate yours however you wish.

3D tealight card

pop-up card tutorial


MEASUREMENTS

CARD BASE IS 5 3/4" X 11 3/4"
SCORE IN THE MIDDLE @ 5 7/8"

FRONT PIECE MEASURES 8 1/8" X 5 3/4"
SCORE THE LONG SIDE @ 3/8" & 2 1/4"

2X DESIGNER PAPER MEASURING 5 3/4" SQUARE

Please check out my youtube video which will show you how i made the card. You can find the links below.

Love Ann xx


Sunday, 10 November 2019

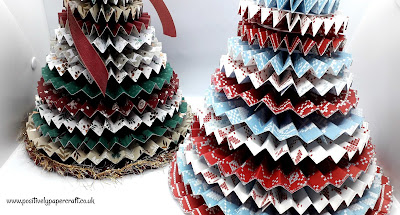
Super Easy Rosette Christmas Tree!

Rosette Christmas Tree, Paper Tree, Rosette Tree Tutorial


Hi Everyone!
Thank yo for stopping by my blog today. I hope you are all well and have had a great Weekend. Today i have a very easy & beautiful Rosette Christmas Tree to share with you. I have been wanting to make one of these for quite some time & i am really pleased that i got to have a go at one! They have been around for ages & there is lots of them on Pinterest etc. As the title states, they are really easy to make but a little time consuming. Its so worth the work though as they look beautiful on display.

Positivelypapercraft

Positivelypapercraft

To make your Tree you will need 12 x 12" sheets of Designer Paper, a circle punch or circle dies, hot glue gun, Ribbon, a star for the top and a small wood stick or a paper straw. You can also use some glitter glue to decorate around the edge of the Rosettes if you wish.

MEASUREMENTS

TAKE YOUR 12 X 12" PAPER AND SCORE ALL SHEETS AT 1/2" BEFORE CUTTING INTO YOUR STRIPS. YOU WILL NEED APPROX 8 OR 9 SHEETS.

3 PIECES MEASURING 12 X 4"

3 PIECES MEASURING 12 X 3 3/4"

3 PIECES MEASURING 12 X 3 1/2"

3 PIECES MEASURING 12 X 3 1/4"

3 PIECES MEASURING 12 X 3"

2 PIECES MEASURING 12 X 2 3/4"

2 PIECES MEASURING 12 X 2 1/2"

2 PIECES MEASURING 12 X 2 1/4"

2 PIECES MEASURING 12 X 2"

2 PIECES MEASURING 12 X 1 3/4"

2 PIECES MEASURING 12 X 1 1/2"

A PIECE MEASURING 22" X 1 1/4"  ( USE A 12" AND 1 10" PIECE AND JOIN TOGETHER)

A PIECE MEASURING 18" X 1  ( USE A 12" & 6" PIECE AND JOIN TOGETHER)

A PIECE MEASURING 12" X 3/4"

Please check out my Youtube video for step by step instructions. You can find the link at the end of this post.
I hope you will give one of these Tree's a try. They would make a great gift for anyone. You could wrap the Tree in Cellophane to make it look extra special.

Bye for now!

Love
Ann xxx


Sunday, 3 November 2019

Easy Light Up Fish Tank

Light up fish tank tutorial


Hi Everyone,
I am back with another tutorial today! I have had this idea in my head for ages, but i have never had time to try it. I am so glad i did get round to it as its adorable!! This would be perfect for kids or even us adults! I will be displaying mine in the living room, its gorgeous and looks lovely at night time all lit up.

mini fish tank tutorial, papercrafts,


This little tank is so easy to make and all you need is some Card, acetate, Fish stamps or dies and a Tea light. The Fish i used were just some cheap dies i picked up on Ebay. I will put the links at the end of the post if your interested in them. The coral i used for the back of the tank are Tree dies from Alinacraft. Just use what you have. I am sure you have some Tree dies or even stamps you could use. The background paper is an Under the sea one from HobbyCraft. Again just use what you have. You could even just use glitter card for the back.

DIMENSIONS

ACETATE MEASURING 6 1/2" X 11 3/4"
SCORE THE LONG SIDE @ 2 7/8", 5 3/4",  8 5/8"  &  11 1/2"

CARD FOR THE LID MEASURES 7 X 7" 
SCORE ALL 4 SIDES @ 2" 

CARD FOR THE BASE MEASURES 5 X 5"
SCORE ALL 4 SIDES @ 1"

PIECE TO HOLD THE TEA LIGHT MEASURES 
3 1/2" X 1" 
SCORE THE LONG SIDE @ 1/2" EACH SIDE .

DESIGNER PAPER FOR THE BACK MEASURES 2 3/4" X 6 3/8"
BLACK CARD FOR THE BACK MEASURES THE SAME.

I hope you will give it a try. Its so easy .

Below you can find the links for the Fish dies i used:
3 PIECE FISH DIE SET

Until next time......

Love Ann xx


Friday, 1 November 2019

Christmas Cantilever Box Tutorial PART 2

How to make a cantilever box


Hi Everyone!
I hope you all had a great Halloween!! I will miss making cute little Halloween projects! I never used to bother but this year i really enjoyed it! Roll on next year :-)
So today as promised i have part 2 of my Cantilever box tutorial! I hope you found the first part easy to understand and realise that its not difficult to make, just a bit time consuming.

Yesterday we covered the base of the box and the 2 lids that flap open. In this tutorial we will cover the 2 boxes that drop down and the Handle. That's it basically!! The decoration is up to you. I linked the products i used in Yesterday's Post so pop over to that if you want the links for what i used. You can also find the links on both Videos.

Cantilever box tutorial


Positivelypapercraft


Below you can find all the dimensions for the rest of the box.

DIMENSIONS:

BOX BASES
2 X CARD STOCK MEASURING 7 X 8 1/4"
SCORE THE SHORT SIDE @ 1 1/2" EACH SIDE
SCORE THE LONG SIDE @ 1 1/2" EACH SIDE

DESIGNER PAPER MEASURES
4 X 5 1/8" X 1 1/4"
4 X 1 1/4" X 3 7/8"


BOX LIDS
CARD MEASURES 2 X  6 1/4" X 6 7/8"
SCORE THE LONG SIDE @ 3/4" EACH END
SCORE THE SHORT SIDE @ 3/4", 1 1/2" & 5 1/2"

DESIGNER PAPER MEASURES 
4 X 5 1/8" X 3 7/8"
4 X 5/8" X 3 7/8"
8 X 5 /8" X 5 1/8" 

HANDLE MEASURES
X 2  CARD 1" X 11 3/4"
SCORE LONG SIDE @1" ON BOTH PIECES

DESIGNER PAPER MEASURES 10" X 3/4" X 2 PEICES 

I hope i have not missed anything off, my eyes are starting to go fuzzy lol.

I will link the video at the end and i really hope you will have a go at this box!! I love it and i am sure you will to!!

Love Ann xx


Year End Clear out!! Grab Some Bargains