Thursday 31 January 2019

Lets Talk Trimmers! (My honest opinion)


Hi Everyone,
Welcome to my Blog & thank you for stopping by!  Today i wanted to talk about paper Trimmers/Guillotines. These Tools are an essential part in paper crafting and can really effect the look of your projects. That is why i have done this review. I have 5 Trimmers (Paper crafting is VERY addictive) which consists of 3 Guillotines and 2 paper Trimmers. These are the 5 that i choose to use, there are obviously more on the market that may even be better but this is my choice.

Tonic Studios Guillotine 


Positivelypapercraft Trimmer review
First off, i am going to start with the BEST Guillotine i have EVER had!! WOW this is amazing and i really can't put into words how awesome this Guillotine is. I had my eye on this for over 1 year but seeing as i already owned 4 cutting tools, i didn't buy it. When i left SU back in December and started doing my own monthly craft kit, i am cutting huge batches of card sometimes and thats when i gave in and bought it.
I am so happy i did!! This slices through 350/400 GSM card without any effort. I have know doubt it will cut even thicker (Chipboard etc) If you are looking for a new paper cutter then this is my choice.
It extends out to 12 1/2" so cutting 12 x 12" paper is know problem. I have provided a link in case you wish to purchase one of these Tonic Studios Guillotine

WoodWare Finger Guard Trimmer


Positivelypapercraft Trimmer review
My next favourite is this finger guard trimmer from Woodware. I have had this Trimmer for about 2 years and its my 'go to' Trimmer. I use it daily and i HIGHLY recommend it. I have nothing bad to say about this Trimmer whatsoever!! It cuts using a rotary blade so you get clean, crisp cuts every time.
Another great thing about this Trimmer is the fact you can change the blades and give your cards some fancy edges! For example: you have a pinking blade, scallop blade, Victorian, scoring & perforated. There may even be 1 or 2 more. The blades just drop in and as its a safety trimmer, you have know fear of cutting yourself!
The Trimmer has an extending arm which goes right up to 16" so you can even cut A3 card/paper!  The blades rarely need changing but you also need to replace the grey cutting strip. They are inexpensive to purchase and you will get 4 uses out of 1 cutting strip.
I would buy this Trimmer again and when this one needs replacing for whatever reason, i have know doubt at all that i will buy one again.
I have provided a link if you would like to purchase this Woodware Trimmer

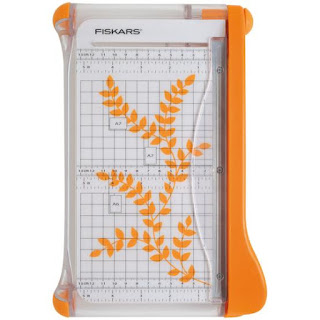
Fiskars A5 Guillotine 


#positivelypapercraft

My 3rd choice is this 5 1/4" Guillotine by Fiskars. This is a perfect size to pop in your bag if you are going to craft classes etc. There is nothing bad to say about this little Guillotine! It will cut thick/heavy card stock without any problems and will give you a perfect clean, crisp cut. Obviously you can not cut 12 x 12" paper on this one but you can cut A4 card (length ways)
Again i have provided a link in case you wish to purchase this Fiskars Guillotine


Tonic/Tim Holtz Mini Guillotine


#positivelypapercraft


My 4th choice is this little Tim Holtz/Tonic Guillotine. Again, there is nothing bad to say about it. You get a perfect, clean crisp cut every time and this will also fit into your bag if you are going to craft class etc. This trimmer is 6" wide so perfect for cutting your 6 x 6" papers. An ideal choice if you are looking for a smaller Guillotine. 
I have provided a link if you are interested in purchasing one of these Guillotines

Stampin' Up Trimmer


The last on my list is the Trimmer/scoring Tool from Stampin' Up. I have has this Trimmer about 3 years now and i purchased it while i was a Demonstrator for SU.  This is my last choice purely because i am not happy with the cutting aspect. I never seem to get clean, crisp cuts and all i use this Trimmer for now is the scoring feature.
You get a cutting blade and a scoring blade on the track so you don't have to keep changing them over to switch between scoring and cutting. This Trimmer also cuts 12 x 12" paper/card. It has an extending arm and also a safety feature where you can lock the cutting track to prevent little hands from getting in!
I do like the scoring feature on this but i just feel like you are forever changing Blades and just never get the clean cut that you need for card stock. My honest opinion is that i would not purchase this again.

So there we have it!! My honest opinion on the 5 Trimmers/Guillotines that i own. Please check out my YouTube video where you can see them all in action. I have placed the link at the end of this blog post.

I was not 'sponsored' in anyway to do this review. Some of the links i provided may be 'Affiliate' links which just means i will earn a small commission if you purchase any of these Trimmers through my links.

I will be back again very soon.

Love Ann xx


Monday 28 January 2019

Positivelypapercraft Valentines Youtube Hop!


Hi everyone,

Welcome to my Blog & also my very first Youtube hop! I am so excited about this as we have some great crafter's taking part. As you can see the theme is Valentines. I hope you will enjoy all the Ladies beautiful projects & also like & subscribe to there channel :-)

I have made this beautiful & really fun pop-up style Valentines card. I love the way it turned out & its really quite simple to make. The little heart die cuts are just glued onto small strips of Acetate & thats how they pop -up. You could also make this type of card for Birthdays and have the pop-ups as Balloons or maybe little cakes etc.


For the front of my card i chose to decorate it with this stunning heart die cut. I cut it from red glitter paper & it looks so pretty. The Die is from the Xcut Brand. I have had it quite a while so i have know idea if its still available. Of course you can put whatever you like on the front. I am sure being a crafter you have lots & lots of Dies! I also used an Embossing Folder for the front of my card just to give it a bit more texture.

DIMENSIONS

WHITE CARD BASE MEASURING 10 1/2" X 5 1/2"

SCORE THE LONG SIDE @ 4 1/4", 4 3/4", 5 1/4", 5 3/4" & 6 1/4" FOLD THESE SCORE LINES IN A VALLEY, MOUNTAIN & SO ON.

WHITE CARD FOR THE FRONT & INSIDE MEASURES 5 1/8" X 4 1/8"

6 X ACETATE PIECES CUT TO 1/2" WIDE & VARYING LENGTHS BETWEEN 2 1/2" & 3 1/2"

Please check out the Youtube hop. You will be able to find all the links to the other Ladies videos in the video description.

I will be back again very soon with some more projects.

Love Ann xx


Saturday 26 January 2019

Using Make-Up Brushes to Blend ink!

Make-up brushes to blend Ink, Papercrafts,


Hi Everyone,

Sorry i have not posted in a while on my Blog, i have been so busy with my new Craft kits. They have took off way better than i imagined! I am just so happy and thrilled that people are loving them and want to support me with my new business venture!

Today i wanted to share these gorgeous Make-up brushes with you. Of course i am not using them for my Make-Up but to blend Ink. I did see a couple of people using them on YouTube and i thought i would give them a try. They only cost about £10 or £11 and you get 10. I have to say that they are so soft and really do feel like silk.

If you are interested in purchasing these brushes HERE is the link. The link will take you to the brushes that i have recommended on my Amazon shop page. It is an Affiliate link so i will earn a small commission if you purchase them.

I have to say that i am very impressed with these Brushes. They are so easy to use and you can build up the colour as you go. Another great thing is that you only have to wipe them on a dry cloth, no need to wash between colours.

I want to start getting into blending Ink more and experimenting with different backgrounds etc. I never really had anything to blend with so iam really pleased that i found these Brushes.  I did do a YouTube Tutorial of my testing out these Brushes. You can find the link at the end of this post.

Thank you for stopping by and i will be back very soon.

Love Ann xx


Friday 18 January 2019

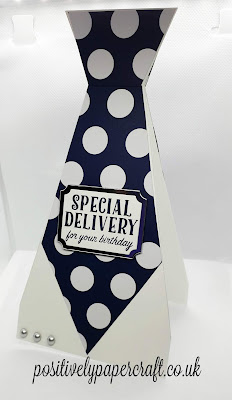
Fun & Easy Male Tie Card!

Positivelypapercraft male tie card


Hi Everyone,
I am back with another project for you! Sorry that i have not been around since Sunday, i have been so busy getting all my January Craft kits packed up & posted out. I have also had some issues to deal with at home to so didn't really feel like doing much crafting.

I think you will like today's project! Well i hope you do, i love it & i think you can tell from the picture what its meant to be. This fun Tie card would be perfect for Fathers Day or any Male celebration. Its so novel and really quick & simple to make. It stands up perfectly & i think whoever receives one will love it.

#papercrafts, #handmadecards, #positivelypapercraft,


You don't need any Dies to make this card, just a Ruler, Pencil & some Scissors!! Obviously you will need paper & card etc. I do recommend using a thick card card base. With the card being quite 'slim' it needs to be stable, a 250 or 300gsm card should do the trick. You could have so much fun with this card & i really think it might be one that you make more than once.

I think it would look so elegant if you made the front 'Tie' from plain card stock and then heat embossed it with Gold or Silver embossing powder. Like i said, you can have lots of fun with this one.

DIMENSIONS

2 X THICK CARD STOCK MEASURING 4 X 8"

SCORE BOTH PIECES ON THE LONG SIDE @ 2"

MARK YOUR CARD AS SHOWN IN MY TUTORIAL @ 1" FROM THE BOTTOM ON EACH SIDE
ALONG THE SCORE LINE MARK @ 2 3/8" & 3 5/8"

MARK ALONG THE VERY TOP AT 3/4" ON BOTH SIDES

DESIGNER PAPER X 2 MEASURING 3 7/8" X 7 7/8"

MARK THESE THE SAME AS THE CARD

Please check out my Youtube video which you can find a link at the end of this blog post.

If you are looking to purchase anything from Craftstash or Amazon, please click my Affiliate links below, i will earn a small commission for any orders you make via these links :-)


Thank you and i will be back on Sunday with another project.

Happy Crafting!!

Ann xx

Friday 11 January 2019

Beautiful Basket Style Gift Box

Ann Melvin-Positivelypapercraft-Beautiful Basket Style Gift Box


Hi Everyone,
Welcome to my Blog and as always thank you for stopping by.
Today i have the most beautiful project for you! I came across a picture of this box on pinterest. It was a written tutorial from a Blog called Dorcas Designs. Here is the link to the Ladies Blog Post

I am so happy with how it turned out! I can not stop looking at it. Please do not be put off by thinking it looks complicated or difficult, it really is very simple to make. I know you will love it if you make one.


I think this box would be perfect for Mothers Day. You could fill it with chocolates and i think anyone's Mum would be so happy to receive this gorgeous box. It is very large inside so you could fit lots of lovely goodies in it. I put some beautiful acetate windows in mine and i just think it compliments the box beautifully. 


This box opens on both sides and closes with Magnets. If you don't have any you could also use some Velcro dots. I slightly altered the original design and created an extra score line so that you can hide the magnets underneath. Plus it also makes the closure slightly more rigid. 

DIMENSIONS

CARD FOR THE BASE MEASURES 12 X 8"

SCORE THE LONG SIDE @ 4" & 8"

SCORE THE SHORT SIDE @ 1 1/4" ON BOTH ENDS.

CARD FOR THE LID MEASURES 12 X 4"

SCORE THE LONG SIDE @ 1/2",  1 3/4",  5 1/4",  6 3/4",  10 1/4" & 11 1/2"

CARD TO STABILISE THE LID MEASURES 1 1/2" X 8"

SCORE THE LONG SIDE @ 2" & 8"

CARD FOR THE HANDLE MEASURES 10" X 1"

DESIGNER PAPER FOR THE HANDLE MEASURES 9 7/8" X 7/8"

Please remember to check out my YouTube tutorial. You can find the link at the end of this blog post.

Also, why not check out my Affiliate links for Amazon & Craftstash. I will earn a small commission if you purchase any products through the links below. 


I will be back again on Sunday with another Video.

Love Ann xx


Wednesday 9 January 2019

'Magical' Triple Twisted Easel Card

#positivelypapercraft, #handmade, #Tripletwistedeaselcard,


Hi Everyone,

Welcome to my Blog and thank you for popping by!
Today i have an adorable & 'Magical' Twisted easel card for you. I have never made one of these before & i have know clue why!! They are simply gorgeous!! Very simple to make & just look beautiful displayed.


This is a very large card as it measures 11 3/4" long. You can make it out of one sheet of UK A4 card stock. USA people can still make it out of one sheet of 8 1/2" x 11", just slightly adjust the scoring. I was actually very surprised at how easy this card was to make! I think it can look a little bit scary but trust me its really simple.

To make my card i used the beautiful 'Enchanted Meadow' 12 x 12" paper pack which i believe is made by Do-Crafts.  I have this paper pad listed on my Amazon shop if you wish to purchase it, here is the direct link: https://www.amazon.co.uk/dp/B07C3M4V1Q/?ref=exp_positivelypapercraft_lv_dp_vv_d
This is one of the most stunning paper pads i have ever owned!! That is the reason i have called my card 'Magical' With all the Unicorns, Fairy's & sparkle, it truly is 'Magical'. I think this card would be perfect for a little girl.

Even the cut out pictures were made using the paper pad. I just picked some fancy dies from my stash and cut them out. You can find the links to some of the products i used in the description of my YouTube Tutorial.

DIMENSIONS

CARD STOCK MEASURING 11 3/4" X 8 1/4"

SCORE THE SHORT SIDE @ 4 1/8"

SCORE THE LONG SIDE @ 3 3/4" ON BOTH ENDS OF THE CARD BUT ONLY TO THE CENTRE SCORE LINE.

CARD MEASURING 4 X 4" FOR THE CENTRE FOLD

DESIGNER PAPER MEASURING 3 7/8" X 3 7/8"

2 X DESIGNER PAPER MEASURING 3 3/4" X 4" CUT BOTH DIAGONALLY SO YOU END UP WITH 4 PIECES

1 X DESIGNER PAPER MEASURING 11 3/4" X 4"

Please remember to check out my Youtube video which you can find at the end of this blog post.

I also highly recommend Craftstash for crafting products! I shop there a lot and there choice and prices are fantastic!! If you click the banner below and purchase any products i will receive a small commission :-)


Bye For now

Love Ann xx

Sunday 6 January 2019

Easy NoteBook Book Marks

Easy Notebook Book Marks/Ann Melvin Positivelypapercraft


#handmadegifts, #positivelypapercraft,


Hi Everyone,

Thank you for popping by my blog today.  I have a really sweet and very practical project for you. I came up with these gorgeous notebook Book marks! Basically a Book mark that also doubles up as a notebook. How cool is that?? These would make fantastic gifts & i also think they would be perfect to sell at craft fairs.

#handmadegifts, #papercrafts,

#papercrafts, #handmadegifts,

They are so quick and easy to make and all you need is some printer/copier paper and some nice patterned paper. I used my crop-o-dile to punch 2 holes in the top and then slotted ribbon through. This secured all my pages together.  Of course you could also secure it together with twine or even just staple it together if you prefer.


My affiliate link for Craftstash


On one of the Book marks i rounded the corners. With it being copier paper  i could round a few sheets at a time. I also trimmed my pages with a craft knife so that they were all the same length. 
I also attached a little charm to one of the Book marks. You could add beads or whatever you fancy. 
Please check out my Youtube tutorial for full instructions on how to make this cute project.


DIMENSIONS

COPIER PAPER MEASURING 11 3/4" X 2"  FOLD ALL PIECES IN HALF

PATTERNED PAPER MEASURING 12 X 2" FOLD IN HALF

I love these handy little Book marks, you could make lots of these in a very short space of time. I hope you will give them and try.

I will be back again very soon with another project.

Love Ann xx


Wednesday 2 January 2019

Theatre/Curtain Valentine Card

#valentinescard, #positivelypapercraft,


Hi Everyone,

Welcome to my Blog. The first thing i want to say is HAPPY NEW YEAR!! I hope you all have a Healthy, Happy & Crafty new year.
It won't be long before its Valentines day again, how quick it comes round! I thought the card i was making today would be perfect as a Valentines card.

I was inspired by the Fan card that i made the other day. Here is a link to the post in case you missed it FAN CARD Again this design can be used for so many different occasions. I just think it looks so elegant. I hope you agree.


As i mentioned in my YouTube Tutorial, you can have the 'curtain' running along the top of your card and also down the side, the choice is yours. I think it looks gorgeous either way. You can also make your fan larger is you like. Just cut the card or paper longer and keep scoring at every 1/2" or 1/4", again the choice is yours.

#positivelypapercraft, #handmadecards,


I hand stamped the little hearts in red ink creating my own background for the card front. I used 2 hearts from my stash, one was cut in gold glitter card and the the other one in white. I stamped a sentiment on with the same red ink. The red bow is a die that also have in my crafty stash. I thought it would be a nice embellishment to add a bow in the middle.

The inside of the card was also stamped with a sentiment. I popped some gorgeous heart embellishments on the front of the card to 'finish' it off.

Please remember to check out my Youtube tutorial, as always i have put the link at the end of this blog post.

DIMENSIONS

CARD BASE MEASURES 4 1/8" X 11 3/4"

SCORE THE LONG SIDE @ 5 7/8"

CARD FOR THE CURTAIN MEASURES 5 7/8" X 4 1/8"

SCORE THE SHORT SIDE @ EVERY 1/2" 

2 X WHITE CARD FOR THE FRONT AND THE INSIDE BOTH MEASURES 4" X 5 5/8"

I hope you have enjoyed my project for today and will maybe give this design a go.

Until Friday.......

Love Ann xx


Year End Clear out!! Grab Some Bargains