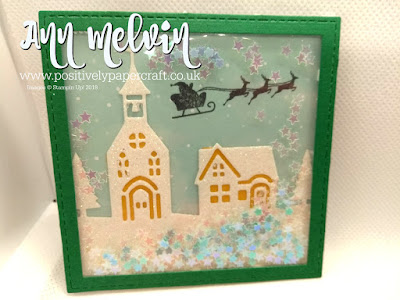
Thursday 29 November 2018

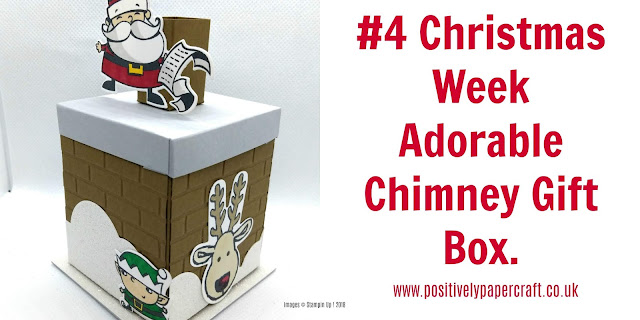
#4 Christmas Week - Adorable & Fun Chimney Gift Box!

Ann Melvin Stampin' Up! Independent UK Demonstrator/Signs Of Santa Chimney Gift Box


How to make a christmas gift box, #stampinupuk, #stampinupdemonstrator,


Hi Everyone,

Welcome to my Blog & project #4 of my Christmas Week! Today i have such a cute & fun gift box for you. Its meant to look like a chimney & i think Kids would love this! You could fill it with lots of sweets or anything you fancy really. It was great fun to make & decorate and is very easy to.


To get the brick effect on my chimney i used a Brick embossing folder. Stampin Up! used to have one but its now retired. I bought mine from Craft Stash so i am sure you can pick one up if you don't have one. I used dazzling diamonds glimmer paper for the snow.

In case you missed yesterdays project, #3 Christmas week Easy pop up tree card, i have popped the link below so you can check it out. 
Pop Up! Tree Card Tutorial

DIMENSIONS

SOFT SUEDE CARD FOR THE BOX MEASURES 10 1/2" X 5 1/2"

SCORE THE LONG SIDE @ 2 1/2",  5",  7 1/2"  &  10"

SCORE THE SHORT SIDE @ 3"

SMOKY SLATE CARD FOR THE LID MEASURES 3 9/16" X 3 9/16"

SCORE ALL 4 SIDES @ 1/2"

SOFT SUEDE CARD FOR THE CHIMNEY POT MEASURES 3 1/2" X 2"

SCORE THE LONG SIDE @ 3/4",  1 1/2",  2 1/4"  & 3"

SCORE THE SHORT SIDE @ 3/4"

STAND/BASE OF THE BOX MEASURES 3 X 3" 


I hope you will have a go at making this adorable little box. Please check out my YouTube Tutorial which has step by step instructions on how i made the box. I will put the link at the end of this post.

Until tomorrow.....

Bye for now.

Ann xx


Wednesday 28 November 2018

#3 Christmas Week - Easy Pop Up Christmas Tree Card


Hi Everyone,

Welcome to my Blog & project #3 of my Christmas Week Series! I hope you are enjoying all the projects so far, i still have a few more great ones lined up for you.The last project will be on Sunday 2nd December.

I was browsing through Facebook a couple of weeks ago and i came across this type of card. I really can not remember who it was that showed it, i just know that it was a craft hack of some sort. Like a 3 minute craft video type of thing. If i see it again i will put a link to the video. I just thought it was so cool and it also looked pretty easy to make.


I love stamping so i decided to hand stamp the inside of my card with cute Christmas Stockings. I think it looks really sweet & also quite vibrant. I used the hostess set which is called Hung With Care.

Hung With Care (Hostess Set when you spend £150 or more)

DIMENSIONS

THICK WHISPER WHITE CARD BASE MEASURING 7 X 10" SCORE IN THE MIDDLE AT 5"

4 PIECES GREEN CARD MEASURING :

1 X 8"

1 1/2" X 8"

2 X 8"

2 1/2" X 8"

SCORE ALL 4 PIECES ON THE LONG SIDE AT EVERY 1/2"

DSP FOR THE FRONT OF THE CARD MEASURES 6 7/8" X 4 7/8"

Please check out my Youtube tutorial for full instructions. I really hope you will have a go at making one of these! It was great fun and i will be making them for my family this year.


Until tomorrow.....

Love Ann xx

Tuesday 27 November 2018

#2 Christmas Week - Easy Origami Christmas Wreath

Ann Melvin Stampin' Up! UK Independent Demonstrator/Dashing Along Origami Wreath


Hi Everyone,

Welcome to my Blog & project #2 of my Christmas Week. Today i have a gorgeous Origami Wreath for you. I love making these & i have to be honest & say that i have been put off from making them as i thought they looked difficult!! How wrong was i?? They really are pretty simple & also very addictive!!

Dashing Along Origami Wreath, #stampinupdemonstrator, #positivelypapercraft,


These are great to hang on the Christmas Tree, put on the front of your cards & even hang them in your car which i where i put mine!! It looks so sweet & the little bells jingle to :-) I love it.


In case you missed yesterdays tutorial i will link it below so you can go & check it out.
#1 Easy shaker Fridge Magnets

Please check out my YouTube video for full instructions. You Basically need 8 pieces of square paper. I used 4 x 4" to make my wreath but you can use any size you like. You can find the link to my video at the end of this post.

I will be back tomorrow with project #3

Bye for now

Love Ann xx


Monday 26 November 2018

#1 Christmas Week - Easy Shaker Fridge Magnets

Ann Melvin Stampin' Up! UK Independent Demonstrator/Shaker Fridge Magnets


Hi Everyone,

Welcome to my Blog & also the start of my Christmas Week!! I am so excited to bring you 7 days of Christmas themed projects. I hope you enjoy the week and the projects i have lined up for you. I have had great fun making them.

I am kicking the week off with some gorgeous shaker style Fridge magnets! These are really simple to make and would be fantastic to give as gifts or you could of course just make them for yourself. The great thing is that you can make these any shape you like. You could do Heart shaped, Circles, Squares or even the shape of a Tree, it just depends what shape dies you use.

#handmadegifts, #createveryday, #papercrafts, #stampinupdemonstrator,
I used Signs of Santa bundle for this Magnet...So cute!!
#handmadegifts, #createeveryday, #stampin up, #craftfairideas, #shakertags,
For this magnet i used the Hometown Greeting bundle.

I also used my Fuse tool to make the shaker part of the magnet. You don't need to use a Fuse tool so if you do not have one don't worry. You can just use foam tape and acetate or even make a shaker pocket using the Laminate technique i have showed you before on my channel.

Please check out my YouTube tutorial for full instructions. You can find the link at the end of this post.

Remeber to use my rewards club code for an extra FREE gift from me if your order is less than £150. You can find the current code below:


Thank you for stopping by and i will be back tomorrow with project #2

Love Ann xx


Friday 23 November 2018

Easy Handmade Note Book & Matching Pen


Hi Everyone,

Welcome to my Blog & as always, thank you for stopping by.
Today i have a very simple project for you that i CASED from the lovely Danielle Rose. You can find the link to her tutorial below:
https://www.youtube.com/channel/UCRmo6huF-GaORXgeS4J4ElQ

I thought this was a great idea as these Notebooks are made from copier paper! All you need is the paper, some pretty Designer Paper and a long arm stapler. You can find the link for the one i used in the description of my YouTube tutorial. I purchased mine from Ebay and it cost around £10. Its fantastic.


I did add a couple of extra bits to mine. The inside pocket, a small envelope at the back & also a matching pen. The pen is so easy to do as its just some rolled up Designer paper slipped inside. I think it just makes a fantastic little gift and would be great to sell at Craft Fairs.

I used the gorgeous Dashing Along designer paper which can be purchased from my Online shop.

149903 Dashing Along DSP
DIMENSIONS

I USED A4 COPIER PAPER AND FOLDED IT IN HALF

DSP FOR BOOK COVER MEASURES 8 3/8" X 12"

DSP FOR ENVELOPE MEASURES 6 3/4" SQUARE, PUNCH & SCORE AT 3" ON THE ENVELOPE PUNCH BOARD.

DSP FOR POCKET MEASURES 6" X 3 3/4"

SCORE 3 SIDES @ 1/4"

Please check out my YouTube tutorial for full instructions. You can find the link at the end of this post.

Until tomorrow....

Love Ann xx


Wednesday 21 November 2018

Week 4 Of The Happy Crafters Christmas Design Team

Hi Everyone,

Welcome to my Blog and week 4 of the Happy Crafters Design Team for November.

I would just like to give a finial thank you to the lovely Andrea Parr & Mandy Pritchard for taking part in the Team. I love what they came up and i hope you did to.

Below you will find the link to Mandy's project:


https://www.aquariuscrafts.co.uk/2018/11/the-happy-crafters-team-christmas_21.html?showComment=1542829961176#c7107879116299533613


Below you will find the link to Andrea's project:

http://www.craftylittleblog.com/2018/11/spirited-snowmen-4-for-happy-crafters.html


Thank you for stopping by and i will be back very soon with lots more projects.

Love Ann xx

Sunday 18 November 2018

Easy Handmade Note Book & Personalized Magnetic Page Marker


Hi Everyone,

Thank you for visiting my Blog today.
You may remember that a short time ago i made a sweet pocket album and also a small notebook to go inside. I have had lots of people asking if i could show you how i made the note book so i have :-) I also decided to make a matching magnetic page marker to.

These would make great little Teacher gifts as i am sure they would put them to go use!


I use magnetic storage sheets to store my dies & i always seem to have loads of little pieces left over. This is a perfect way to use them up! Both of these projects are so easy to make. I do recommend using a crop-o-dile for these projects. I could not be without mine now.

I also used eyelets for both projects and they measure 5mm across the top of the eyelet. I also used the 3/16" hole on the crop-o-dile.

DIMENSIONS FOR NOTEBOOK

2 X DESIGNER PAPER MEASURING 4" X 2 3/4"

SCORE BOTH PIECES ON THE LONG SIDE @ 3/4"

APPROX 20-25 SHEETS OF 80GSM COPIER PAPER MEASURING 4" X 2 3/4"

SCORE ALL PIECES ON THE LONG SIDE @ 3/4" i ALSO RAN MY TIM HOLTZ PERFORATION TOOL OVER THE SCORE LINE SO THE PAGES CAN BE TORN OUT.

DIMENSIONS FOR MAGNETIC PAGE MARKER

CARDSTOCK MEASURING 7" X 1 1/2"

SCORE THE LONG SIDE @ 3",  3 1/2" & 4"

DESIGNER PAPER X2 MEASURING 2 7/8" X 1 3/8"

2X MAGNETIC MEASURING 1 3/8" X 2 5/8"

As always please check out my Youtube tutorial for full instructions. I will put the kink at the end of this post.

The paper i used for these projects is Festive farmhouse and i also used the large letter framelits.

Bye for now......

Love Ann xx


Friday 16 November 2018

Pretty Heat Embossed Chocolate Gift Box


Hi Everyone,

Welcome to my blog!
Today i have a really sweet little gift box that i made to hold some yummy chocolates! I also heat embossed the box with Gold embossing powder and Timeless Tidings stamp set. I feel like i have not done any heat embossing in so long!

I used a cute heart shape die to get the fancy border but you can use whatever you have, a punch or die.


I also closed my box with some velcro but you could also magnets, ribbon or even make a matching belly band. You have lots of different options.


This is a very easy and quick box to make and it would make a great teachers gift. You could buy a big tin of chocolates and make lots of these boxes!! A very inexpensive way to make lots of Christmas gifts.

DIMENSIONS

CARDSTOCK MEASURING 7" X 7 1/2"

SCORE THE LONG SIDE @ 2",  3",  5" & 6"

SCORE THE SHORT SIDE @ 1" & 6"

Please check out my YouTube tutorial for full instructions. You can find the link at the end of this post.
You can also purchase any of the supplies from my 24hr online shop. Remember to use my hostess code if your order is less than £150. This will enter you into my rewards club.

 Until Sunday......

Love Ann xx


Wednesday 14 November 2018

Week 3 of November Design team-Spirited Snowmen

Hi Everyone,

Welcome back to my blog & week no3 of the Happy Crafter's Christmas design team! I really hope you are enjoying the Ladies projects and i hope its giving you lots of inspiration! I love seeing what they come up with and its a pleasure to have them on the team.

I will just get straight into giving you the links to pop over to the Ladies Blogs and check out there projects.

Here is the Link to Andrea's Blog & project:

http://www.craftylittleblog.com/2018/11/magic-never-ending-gift-box-happy.html


Below is the link to mandy's project and Blog:

https://www.aquariuscrafts.co.uk/2018/11/the-happy-crafters-team-christmas_14.html


Thank you for popping by and you can purchase the stamp set from my 24hr online shop.

Love
Ann xx

Presentation Folder For Pocket Letters-Large & Small


Hi Everyone,

Welcome to my Blog and thank you for popping by today.
My tutorial for today is a cute presentation folder for your pocket letter swaps. Its is so easy to make and a great way to upscale your swap!! I have also added some envelopes so you can fill your swap with some extra goodies!


I made a large folder and a cute mini one. The mini pocket letter is from Stampin Up! memories and more range. Also, if you have a Fuse Tool you could easily make your own mini pocket letter. As i said in my tutorial, i will give you the dimensions for the mini folder in case you would like to make it.

MINI FOLDER DIMENSIONS

CARDSTOCK MEASURING 10 1/2" X 7"

SCORE THE LONG SIDE @ 4 3/4",  5 3/8" & 6"

DESIGNER PAPER X 3 MEASURING 4 5/8" X 6 7/8"

The mini pocket letter measures 5" x 7" and the pockets are 2 1/8" x 2 1/4"

To make the large pocket letter folder you will need 2 pieces of 12 x 12" cardstock. I purchase my pocket letter sleeves from Ebay and you can find the link in the description of the YouTube tutorial.

DIMENSIONS FOR LARGE FOLDER

2 X 12 X 12" CARD MEASURING 11 3/4" X 9 1/4"

SCORE THE SHORT SIDE @ 3/4" ON BOTH PIECES

3 X DESIGNER PAPER MEASURING 8 3/8" X 11 5/8"

4 X DESIGNER PAPER FOR THE ENVELOPES MEASURING 8 1/4" X 8 1/4"
PUNCH AND SCORE @ 3 3/8" ON THE EPB TO MAKE A 4 X 6" ENVELOPE.

I hope you like my presentation folders and will maybe give it a go next time you have a swap.

Thank you

Love Ann xx


Saturday 10 November 2018

Gorgeous Envelope Gift Book/Pocket Album


Hi Everyone,

Welcome to my Blog and thank you for popping by!!
I wanted to share my latest project with you which i made as some happy mail. The idea is that you load the little envelopes up with crafty bits and pieces! How sweet is that?? perfect for your crafty friends.


I made 2 of these gorgeous little envelope books. A Christmas one and a non Christmas one. For the Festive book i used the stunning Joyous Noel Designer paper. I think this paper is my new favourite! It is absolutely beautiful.

This sweet little book is really easy to make and of course you can choose to make it in any style and design you wish. I also made my own cute little notebook which i put in the Christmas version. I will do a tutorial on this if anyone is interested. Its so easy to make.


As well as envelopes i also put a ribbon sampler in. Some of my envelopes were made from vellum and they all have a Velcro closure. I am so pleased with this little project and i think they make great little gifts.

DIMENSIONS

2 X CHIPBOARD/THICK CARD MEASURING 4 1/2" X 3"

2 X DESIGNER PAPER TO COVER THE CHIPBOARD MEASURING 6 1/2" X 5"

SCORE ALL 4 SIDES @ 1"

2 X DESIGNER PAPER FOR INSIDE COVERS 4 1/4" X 2 3/4"

DESIGNER PAPER OR VELLUM FOR ENVELOPES MEASURES 5 3/4" X 5 1/2"

SCORE THE LONG SIDE @ 1 3/8" & 4 1/8"

SCORE THE SHORT SIDE @ 1/2" & 4 1/2"

Please check out my YouTube tutorial for full instructions. You can find a link to the video at the end of this post.

Don't forget that for everyone who orders with me this month will get FREE P&P!! I will refund your £4.95 p&p back through paypal once i have received your order. 

Please also remember to use my Hostess/rewards club code for an extra free gift from me.


Until next time......

Bye for now
Ann xx


Wednesday 7 November 2018

Week 2 Of November Design Team-Spirited Snowmen

Hi Everyone,

Thank you for stopping by my blog today.
I am so pleased to tell you that today we have week 2 of the Happy Crafters Design Christmas Design Team! I loved the projects the Ladies made last Week and they have not dissapointed again!!

Here we have Andrea Parr's project and also the link to her her blog. Please pop over and check it out.

http://www.craftylittleblog.com/2018/11/spirited-snowmen-happy-crafter-design.html

Here is the link to Mandy Pritchard's blog:
https://www.aquariuscrafts.co.uk/2018/11/the-happy-crafters-team-christmas.html


Thank you for popping by!!

Love Ann xx

Spirited Snowmen 

Sunday 4 November 2018

FREE UK POSTAGE IF YOU ORDER WITH ME THIS MONTH!!!


Hi everyone,

Just to tell you about an amazing offer i am doing for the rest of November! If you shop Stampin Up! through me i will refund your postage back to you! How cool is that?? You can buy extra supplies now :-)

All i ask is that you must spend a minimum of £10 before postage costs are added to your order. I will then refund your postage back via paypal (£4.95)

Please remember to use my hostess code as you will still receive a gift from me if your order is a minimum of £20.


This offer runs from the 4/11/18 to 30/11/18

Happy shopping!!!

Love Ann xx

Friday 2 November 2018

Collaboration With Olga Direktorenko-Christmas project Using Non Christmas Supplies


Hi Everyone,

Welcome to my blog on this fabulous Friday!! I am so excited to tell you that today i am doing a collaboration with the very talented Olga Direktorenko!! I am so thrilled! I love Olga's work, she is so talented & i have followed her for a long time now. We were going to get together a while ago but i think we were both just so busy.

The theme was to make a festive project without using any festive supplies! A bit of a challenge but it was great fun. I came up with this adorable and very easy Rudolf card. How cute is he??? This would be a great card for the kids or anyone for that matter. I hope you like it.

Please go over and check out Olga's project and subscribe to her channel. She really does make the most stunning projects! Here is the link to her channel:
https://www.youtube.com/watch?v=SXc8XrlN2fs


You can find out how i made the card on my YouTube Channel. I have put the link at the end of this post.

Until next time.....

Love Ann xx


Thursday 1 November 2018

The Happy Crafter's Christmas Design Team!

Hi Everyone,

Welcome to my Blog and as always, thank you for stopping by.
I am so pleased to tell you that for the next 2 months i have brought back my Design Team. I thought it would be great to get some extra inspiration for Christmas.

So kicking off November's team we have the lovely Andrea Parr and Mandy Pritchard. The ladies will create 4 projects over the next 4 weeks with the stamp set that i provided for them. I will put the Ladies projects below and also a link to there blog so you can pop over and find out all about there projects.

So below we have Andrea's project and also the link to her blog post.
http://www.craftylittleblog.com/2018/11/happy-crafters-design-team-spirited.html


Next we have Mandy's project and also the link to her blog:
https://www.aquariuscrafts.co.uk/2018/11/the-happy-crafters-design-team.html


I love what the Ladies have made and the stamp set that they used is called Spirited Snowmen. How cute is it??? I love it.

Item no: 148072
You can order the stamp set from my 24hr online shop if you wish as well as any other supplies you may need. Please remember to use my hostess code so you can be part of my rewards club.


Please make sure to pop over to there blogs and don't forget to come back next Thursday and see what they create for week 2.

Bye for now

Ann xx

Year End Clear out!! Grab Some Bargains