Sunday 28 April 2019

Fold Flat Window Tuck Card

Positivelypapercraft card tutorial


Hi Everyone,
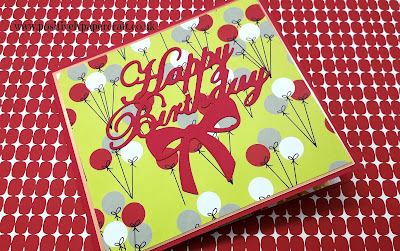
I am back today with a really pretty card tutorial. I decided to call this a 'Fold flat window tuck card'. I have no idea if there is another name for them as i just sort of came up with this as i went along. As the title states, it folds totally flat & you can fit it in a 6 x 6" envelope. The centre window part comes out allowing the card to fold flat like a regular card. I think its a pretty good idea.

Card making tutorial, #positivelypapercraft


I made my card in a Birthday theme but you can make yours in any style you like. I love the bright colours i chose for mine. You could have some real fun coming up with different ways to decorate this card.

DIMENSIONS

CARD BASE MEASURES 5 1/2" X 11 3/4"
SCORE IN THE MIDDLE @ 5 7/8"

CARD FOR THE WINDOW MEASURES 5 1/2" X 6 1/2"
SCORE THE LONG SIDE @ 1/2" ON BOTH ENDS & CUT OUT YOUR APERTURE.

A PIECE OF ACETATE MEASURING 5 1/4" x 5 1/4"

2 X DESIGNER PAPER MEASURING  3 3/8" x 5 1/4"

2 X DESIGNER PAPER MEASURING  2" x 5 1/4"

1 X GOLD FOIL MEASURING  5 5/8" x 5 1/4"

1 X DESIGNER PAPER MEASURING  5 1/2" x 5 1/8" 

As i stated in the video i used Alinacraft large number dies. You can purchase them HERE

Please check out my youtube tutorial for full instructions on how to put this card together. You can find the link at the end of this blog post.


Until Tuesday.....

Love Ann xx

Thursday 25 April 2019

Easy Ribbon Storage Box

Positivelypapercraft ribbon storage box


Hi Everyone,

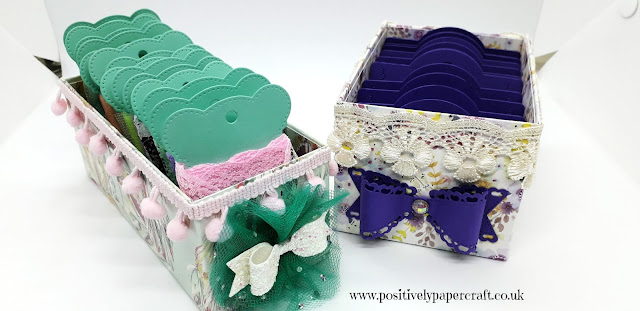
Welcome to my Blog. Today i have a great tutorial that is also very practical. I think we are all guilty of having to much ribbon lol. We all have bits here and there so i think these cute boxes are a great way to store them.
I was inspired to make this box by a lady on YouTube called 'Happy Mail Queen' I have put a link to her channel in my video description. I made my box in a different way but i love the general idea.

Craft room storage tips

positivelypapercraft ribbon storage box


My boxes are made from chipboard but if you don't have any you can use cereal boxes etc. The ribbon spools are dies and you can find the links for them in my video description. If you don't have the dies you can easily make your own. I will list the dimensions below for both size boxes.

DIMENSIONS

WIDE BOX
CHIPBOARD X 2 PIECES MEASURING 3 1/2" X 3"

2 X PIECES MEASURING 3" X 5"

1 X PIECE MEASURING 3 1/2" X 5"

YOU ALSO NEED 1 FULL 12 X 12" SHEET OF DESIGNER PAPER

YOU ALSO NEED 5 PIECES OF DESIGNER PAPER JUST SLIGHTLY SMALLER THAN THE CHIPBOARD MEASUREMENTS ABOVE. THESE ARE TO COVER THE INSIDE OF THE BOX.


LONG THIN BOX

CHIPBOARD X 3 PIECES MEASURING 2 1/2" X 6"

2 X CHIPBOARD MEASURING 2 1/2" X 2 1/2"

YOU ALSO NEED A FULL 12 X 12" PIECE OF DESIGNER PAPER AND ALSO 5 PIECES CUT SLIGHTLY SMALLER THAN THE CHIPBOARD PIECES TO COVER THE INSIDE OF YOUR BOX.

I hope you like the boxes i have made and will give them a try for yourself. I will also put the link to my Youtbe video at the end of this blog post.

Until next time....

Love
Ann xx


Friday 19 April 2019

Design Team Projects :-)

Cardmaking ideas, Birthday card


Hi Everyone!!
Thank you for popping over to my Blog today :-) I am back with some of my Design Team projects. I really wanted to come on and share them with you. I hope you enjoy them and also gain some inspiration from them. Sometimes we all need inspiration as at times your mind just seems to go blank! I hate it when that happens.


Alinacraft design team

Papercrafts, Alinacutle dies

Alinacutle project shares


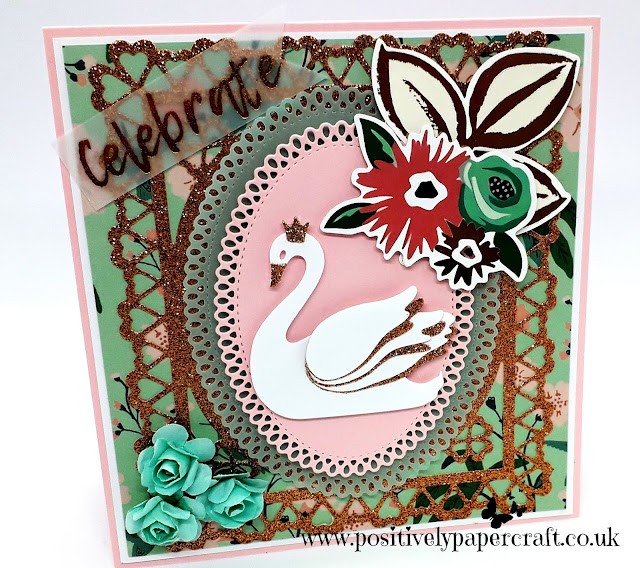
I love this card i created!! How beautiful is it??? I also created a gorgeous box for it as i did not want to risk squashing it in an envelope. I created this for a special Friend and i am sure she will love it :-)
The dies i used are all from Alinacraft, i will put all the links below in case you would like to pop over to Alinas shop and purchase them.
The flowers, sentiment and ephemera are all from my crafty stash. The background paper is from a Maggie Holmes paper pad i had in my stash. I have never really used it and its so pretty. I am trying to make a point of using my crafty stash!

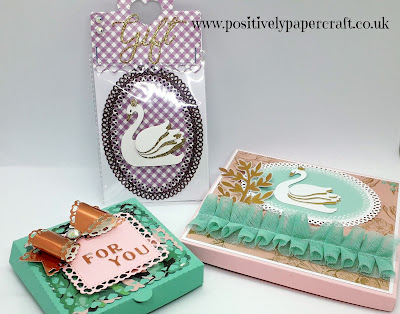
I also made a really sweet Pizza Box using another of Alinacutles dies. I really love this pizza box as its quite large and its so cool that you get 2 Alphabets with it! You get a large set, a smaller set and also numbers with it. I cut out 'For You' and glued that onto the top of my box. Inside i cut out some adorable new Bag Topper dies and i decorated them. The person i am sending this parcel to can use them for her future projects. The layering squares on the top of the Pizza Box are also from Alinacutle. I Love these dies as they have a heart border.

Alinacraft project shares


The last project i made was a gorgeous Swan Topper. Again the recipient can use this for one of her future projects. I used another new Bag Topper die and also some beautiful new oval dies that also come with the word 'Gift' I honestly have to say that these are my favourite dies at the minute. They are so beautiful.

Alinacraft project shares


I hope you like my Design Team projects and please feel free to pop over to Alina's store on Aliexpress. Here are the links for all the products i used.

*SWAN DIE*
*BOW DIE*
*SMALL HEART BOW DIE*
*HEART BAG TOPPER*
*SQUARE TOP BAG TOPPER*
*TEAR DROP OVAL DIE SET*
*SQUARE HEART BORDER DIES*
*4 PIECE HEART FRAME*

Please check out my Youtube video to see the projects & products in more detail. You can find the video link at the end of this blog post.

Love
Ann xx


Tuesday 9 April 2019

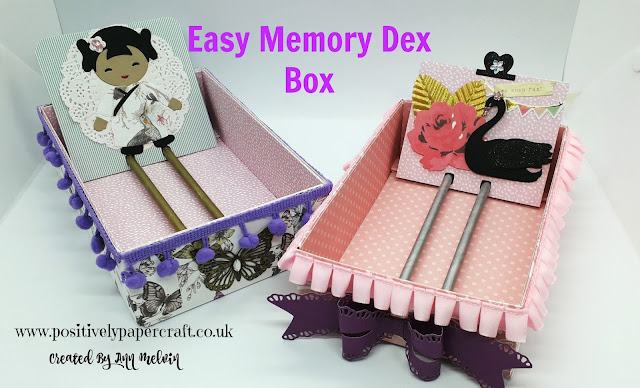
Easy Memory Dex Box Tutorial

Easy memory dex tutorial


Hi Crafters!
I am back with another tutorial! You may remember last week i told you that i wanted to start making memory dex cards. I have been meaning to start them but just never seen to get time. When i got my latest DT package from Alinacutle that give me the push to start them as there was a really cool Memory Dex Die set in it. I shared it with you all in my last you tube video.

I began looking online for a memory dex storage system but i found they were so expensive! Then i had the idea to make my own. I am so pleased with it & because i have made it from chipboard its super strong! The 2 runners are made from paper straws! How cool is that?? I just coloured mine in with a permanent metallic marker. Its a fantastic box and i am sure you will agree with me if you make one :-)

Easy memory dex box tutorial, #positivelypapercraft,


memory dex tutorial


make your own memory dex box, #positivelypapercraft, #alinacutle,


These are also my first ever memory dex cards! I created them using 2 new dies from Alinacutle. The gorgeous Black Swan Die & also the adorable little Asian Girl Die As i said before the memory dex card is also created from Alinacutles Memory Dex die set. I love it as you can also create different edges with it.

If you want to have a go at making one of these boxes all you will need is some chipboard. If you don't have that you could also use an old cereal box. You will also need some scrapbook paper, 2 paper straws & i recommend a hot glue gun. I also glued some gorgeous trim around the outside of the boxes, you could also use Ribbon or whatever you have in your crafty stash.

DIMENSIONS

1 X CHIPBOARD MEASURING 4 1/2" X 7" 

2 X CHIPBOARD MEASURING 2" X 7"

2 X CHIPBOARD MEASURING 2" X 4 1/2" 

4 X CHIPBOARD MEASURING 3/4" X 4 3/8" 

1 SHEET 12 X 12" PAPER

1 X DESIGNER PAPER MEASURING 7 X 4 1/2" 

2 X DESIGNER PAPER MEASURING 2 X 7" 

2 X DESIGNER PAPER MEASURING 2 X 4 1/2"

2 X DESIGNER PAPER MEASURING 5 1/2" X 1 3/4"

You can find the link to my Youtube video at the end of this post.

I hope you like my project and will try one of these boxes yourself :-) you will be very surprised at how strong and sturdy they are.

Until next time......

Love Ann xx


Tuesday 2 April 2019

Tutorial Tuesday for Hobby Base DT team

#hobbybase, #positvelypapercraft, #lawnfawn,


Hi Crafter's

Today is another Tutorial Tuesday from Hobby Base and this adorable card i made is the feature. I just love it!! Its so cute and i think whoever receives it will love it to. Its perfect for anyone who loves Unicorns and i no lots of you do!

The cute stamp set i used is from Lawn Fawn and i no its one that i will use time and time again. Its a really simple card to make and you can find all the instructions over on the Hobby Base Facebook page. I will put the link at the end of this post so you can check it out.

I am really enjoying my time as a DT member and i am so thankful to Hobby Base for choosing me :-)

Until next time.....

Ann xx

https://www.hobbybase.co.uk/designteam/dteam-AM3/?redirect_log_mongo_id=5ca33056c040dd00327bd560&redirect_mongo_id=5c6ec4d0e635a300639410da&sb_referer_host=www.facebook.com&utm_campaign=Trackable+Links&utm_medium=Web&utm_source=Springbot

Tutorial Tuesday for Hobby Base DT team


Hi everyone,
Today i am sharing another card that i made for Hobby Base DT team. This was another card that was featured for there Tutorial Tuesday feature on there Facebook page a couple of weeks ago.  I used the gorgeous Mandala Dreams paper pad to make the little squares on the card.

Again this is a very simple card to make and you could change out the words and make it for lots of different occasions.

If you would like to no how i made this card, i have put the link at the end of this post which will take you to there Facebook page with all details on there.

Until next time.....

Ann xx

https://www.hobbybase.co.uk/designteam/dteam-AM2/?redirect_log_mongo_id=5ca32e9bfe0da300368d3eb8&redirect_mongo_id=5c6ebc1ce635a3006b941068&sb_referer_host=www.facebook.com&utm_campaign=Trackable+Links&utm_medium=Web&utm_source=Springbot

Tutorial Tuesday For Hobby Base DT Team.


Hi Everyone, with moving home and being so busy i feel i have neglected my Blog a little. As most of you no that i am a DT member for Hobby Base, i have had a few of my cards shown for there Tutorial Tuesday feature so i am going to be posting them to my Blog.

This was the first card  made for Hobby Base and i love it. I think the black background really makes the card stand out against the gorgeous Mandala Dreams Paper Pad. Its a very simple card to make and you could make this for lots of different occasions.

I have put the link at the end of this post which will take you the Hobby Base page and you will find the written tutorial on how i made this pretty card.

Until next time.....

Ann xxx

https://www.hobbybase.co.uk/designteam/dteam-AM1/?fbclid=IwAR04GsYkBh5jwY9x1fWdlf0NdE6tF7FOGnTzI6ZPCDZ_UmM8Unr5lkRGD2s

Year End Clear out!! Grab Some Bargains