Sunday, 17 February 2019

Alina Craft Design Team Share


Hi Everyone,
Welcome to my Blog & thank you for stopping by. Some of you may know that i am now a member of Alina Crafts Design Team. I am thrilled to be part of her Team & really looking forward to sharing lots of new products & examples with you.

Alot of the Dies that you see above in the picture are new releases in Alina's store on AliExpress. I will put all the links at the end of this post as well as in the description of my Youtube video. Today i only have a few examples to share with you but i will be bringing you lots more next week so make sure you don't miss them.


Please make sure you check out my Youtube video where you can see all the Dies in better detail & also the projects/examples i made with them.

Here are the links to all the Dies :

Little Girl Die
SmallTreat Bag Die
Circle Heart Border Dies
Large Treat Box Die
Square Heart Frame Dies
Diamond Lattice Background Die
Swirly Butterfly Die
Large Layered Flower Dies
Crafty Mail Stamp set
Happy Birthday Die
Swap Mail Stamp Set

Until next time......

Love Ann xx


Thursday, 14 February 2019

Gorgeous Wreath Easel Card

Easel Card Tutorial #positivelypapercraft


Hi Everyone,

Welcome to my craft Blog & thank you for popping by. I am really pleased with Today's project & i hope you are to! This is an Easel card that has the most gorgeous Wreath attached to the top of the card.  The great thing is that it folds down flat so you can put it in a regular envelope. I love this card & i think it would be perfect for a Mothers Day card.

#positivelypapercraft #wreatheaselcard


I used a cute bow die to decorate my wreath but you could also use Flowers or Butterfly's etc.  Anything you like really, its so versatile. I also made my card base from a lovely layering die set i have but again you don't need to use fancy dies. If you want to use a plain card base just cut your card to 5" x 10 & score the long side @ 2 1/2" & 5". To make the wreath i just used some plain circle dies but if you don't have them you could draw round a CD or even a plate! Then just cut it out with some scissors.

The Pink & Black card was made with a paper pad by DoCrafts called Folkland & the white & Blue card was made with a stunning First Edition paper pad called Floral Pavilion. If you check out my YouTube Tutorial you will find a list of some of the supplies in the video description.

You could maybe even turn this into a Valentines card by changing the colours and decorating the wreath with hearts. I think that would look so pretty.


I hope you like the project i have brought you Today and you can find the YouTube video on my Channel and also a link to it at the end of this post. I will be back again on Friday with another tutorial.

Bye for now

Love Ann xx


Sunday, 10 February 2019

Creative Options Craft storage Box

#positivelypapercraft

Hi Everyone,
Welcome to my blog and thank you for stopping by today. I just wanted to share this amazing craft storage box with you that i was very kindly sent from a company called Creative Options. I love it and its perfect to store all of my crafty bits and bobs. I love the way that its all contained together and it saves me from going to different storage boxes to find things.


craft room storage ideas

positivelypapercraft craft storage box

The size of the box i got sent is a small and you can also get Medium and Large. The small one has 4 storage boxes inside which has loads of little compartments to hold all your bits and bobs. The lid also lifts off and there is a good size storage space in there. I put my bottles of craft glitter in there. There is also a carry handle so its really easy to transport.  I was sent the blue and black colour and you can also get it in pink and black.

These storage systems are great for your craft room and i am sure that i will be going off to order the medium size or the Large. I just love the way they look and it looks so cute sitting in my craft room.  Its also really good quality and i know you will love it to.

Please check out my Youtube Video where you can see this storage system in action. I have put the link at the end of this post. I will be back on Wednesday with another tutorial.

Bye for now

Love Ann xx


Saturday, 9 February 2019

Fun Pull Out Accordion Style Card!

Valentines card, #positivelypapercraft


Hi everyone,
Happy Saturday!!! I hope you all have a great Crafty weekend! At some point over the Weekend i am off to HobbyCraft!! I love that shop but don't get to go very often as its a bit of a drive so really looking forward to going. I will probably end up getting craft supplies i don't need but hey lol never mind :-) The way i see it is, i don't drink or smoke and i don't go out or buy expensive clothes etc so this is my treat :-)

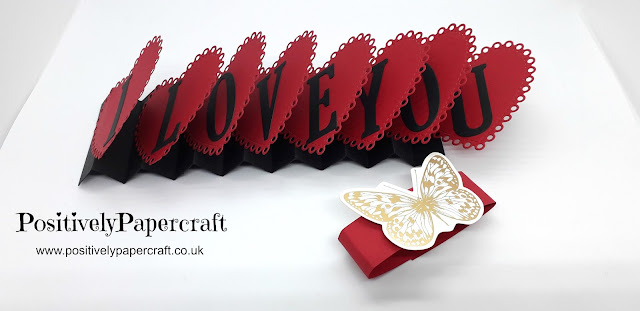
So i wanted to share this cool pull out accordion style card with you. I have seen them around and thought they looked pretty cool. As Valentines Day is getting closer, i thought i would make it in a Valentines theme. When you open it out, it says 'I love you', how sweet.  I love the Red & Black and it looks very striking. I hope you like it to.

Positivelypapercraft Valentines card


It all folds in and is kept together with a belly band. I had a lovely pack of gold foil ephemera so i glued a Butterfly on the front of the Belly Band. I think the Gold & White goes so well with the Red & Black. Its really simple to make and you can use any shapes you like. Hearts, squares, circles etc. You could also spell out Birthday or anything you like, maybe someones name.

DIMENSIONS

BLACK CARD MEASURING 11 3/4" X 2 3/4"

SCORE THE LONG SIDE @ EVERY 3/4"

BELLY BAND MEASURES 1" X 8 1/4"

I have had a few people asking me where i got the Heart dies from. I bought them from THE WORKS but i have know idea if they are still available to purchase.

I hope you will give this project a try and i will be back tomorrow with another project.

Bye for now

Love Ann xx


Wednesday, 6 February 2019

Craftaddictionuk.com Bunting Die Review!!


Hi Everyone,

Today i have the pleasure of reviewing a Die from a company called craftaddictionuk. Please go and check out the website as there is lots of lovely dies on there.
I am reviewing a very large bunting Die. The die was designed by the owner of the company and he will be bringing out more of his designs in the near future.

As i said its a very large die and it measures 4 3/4" x 3 5/8". I loved how sturdy it was and the paper just fell out of the die when i ran it through the Bigshot. The stitching around the outside of the Die is a lovely feature.

I made a really cool banner for my craft room which spells out my name (positivelypapercraft) I also added some cute little scissor die cuts that i had in my stash. It looks gorgeous hung up in my room.

I also made a card with the die so its not just for Bunting. With it being a very large die, it makes a whole card front and all you have to do is decorate it.

If i get a chance i am also going to make a 'Craft Room' sign with it and hang it on my door. I think that would look really nice.


Please pop over and check out the website, the link is at the top of this post.

Thank you for stopping by and i will be back on Friday with another Project!!

Love Ann xx

Sunday, 3 February 2019

Gorgeous Flip Flap/Shutter card Tutorial


Hi Everyone,

Welcome to my Blog and thank you for stopping by!!
I am really pleased with Today's project and i think you will be to! I am calling this a Flip Flap/Shutter card. It reminds me of those shutter blinds that people have in there window. Its a really cool design.

I came across this type of card on another YouTube channel called JK arts. I did make some changes to the measurements and also simplified the instructions a little as i found them a little tricky to follow. Please don't be put off thinking it looks really hard and complicated...its really not!!


I think this card would be great for Valentines Day but you could also change the Hearts for Cakes or Balloons and turn it into a Birthday card. It would also be great as a Mothers Day card.


Another thing i like about this card is that it folds totally flat. It also stands up perfectly to. A really great card for lots of different occasions.

DIMENSIONS

2 X THICK CARD STOCK MEASURING 7 7/8" X 4 3/4"

MEASURE 1 PIECE 5/8" IN AND CUT OUT A RECTANGLE FROM THE MIDDLE,

3 X CARD STOCK MEASURING 2 7/8" X 4 3/4"

SCORE THE LONG SIDE @ 5/8" ON BOTH SIDES
SCORE THE SHORT SIDE @ 3/4"

DESIGNER PAPER X 6 PIECES MEASURING 2 X 3 3/8"

WHITE CARD FOR STAMPING MEASURES 2 1/2" X 4 3/8"


2 X CARD FOR PULL TABS MEASURING 2 X 1"

I hope you have enjoyed my tutorial today and you can find the link to my Youtube video at the end of this post.

Bye for now.....

Ann xx


Year End Clear out!! Grab Some Bargains