Hello, my name is Ann Melvin. I am a paper craft designer, Blogger, You-tuber & a total craft addict! My blog is full of great tutorials & inspiration. I post new content at least 3-5 times per week.
Friday 28 February 2020
Stamp Storage Box With Matching Dividers-More Craft Room Storage!
Hi Everyone :-)
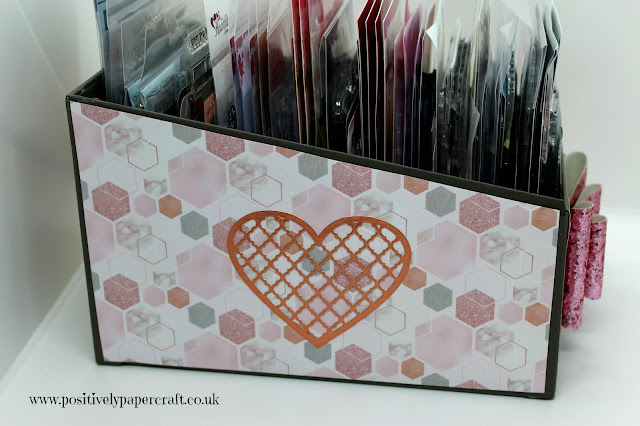
Today I am back with more craft room storage! I think every crafter needs somewhere to store there stamps. The great thing about this one is that you can make it in any colour/decoration you like! Its super strong as i made it from Gray board. Another cool thing is i made matching dividers so i can actually find the stamps i need without searching for ages! I hate that & it really puts me off.
If you follow my YouTube channel etc you will know that i have been making loads of Craft Room storage these last few weeks. We all know that it can be expensive but i think the main thing is finding the type of storage we need. This can be tricky & then its not always in the colour or style we like. You won't have that problem with this! You can make it to match your colour scheme or style etc. Its not hard to make & its really just the same method as most of my other storage items.
This holds loads of stamps & its super strong. I also made some matching dividers which i then labelled with my Brother label machine. You can of course just hand write on your dividers or even print some off with your PC etc. You can choose to store them in any order you wish. I hope you will give this box a go. I love it & it looks so pretty in my Craft room. Especially the big Glitter Bow i made for the front.
Please find all the measurements listed below in Metric & Imperial:
2 PIECES CHIPBOARD MEASURING 9 1/2" X 6"
OR
24.1 CM X 15.2 CM
(MEASURE UP 4" FROM THE BOTTOM AND CUT FROM THAT MARK TO THE TOP CORNER, THIS WILL GIVE YOU THE SLOPING SIDES. DO THAT TO BOTH PIECES)
1 PIECE MEASURING 6 1/2" X 4"
OR
15.2 CM X 10.2 CM
1 PIECE MEASURING 6 1/2" X 6" (BACK PIECE)
OR
15.2 CM X 16.5 CM
1 PIECE MEASURING 6 1/2" X 9 1/2" (BASE)
OR
16.5 CM X 24.1 CM
YOU WILL ALSO NEED YOUR JOINING PIECES (HINGES) WHICH ALL MEASURE 1 1/4" WIDE AND SCORED @ 5/8" ON THE SHORT SIDE. TO DETERMINE THE LENGTH JUST USE YOUR PIECES OF CHIPBOARD TO GET THE RIGHT LENGTH.
FOR MY PATTERNED PAPER I JUST CUT IT AROUND 1/8" SMALLER THAN THE CHIPBOARD
DIVIDERS
CARD STOCK MEASURING 6 1/4 WIDE & THEN WHATEVER HEIGHT YOU WANT TO MAKE YOUR DIVIDERS.
I MADE MY FIRST ONE AROUND 4 1/2" TALL THEN MOVED UP AROUND 1/2" SO THEY GOT TALLER TOWARDS THE BACK OF THE BOX.
I PUNCHED THEM @ 2" ON THE ENVELOPE PUNCH BOARD TO MAKE THE TAB.
Please check out my YouTube tutorial for full instructions.
I will be back tomorrow with some crafty Bargains/Goodies i got throughout the week.
Bye for now
Love Ann xx
Thursday 27 February 2020
Beautiful Bonnet Wall Decoration-Great For Mothers Day
Hi Everyone,
I did not get a chance to do a blog post for this 'Bonnet' decoration when i made the YouTube video the other day. I thought i would quickly type one up before my next tutorial.
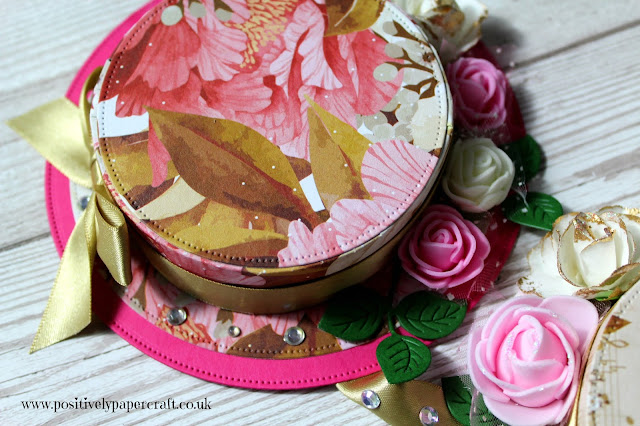
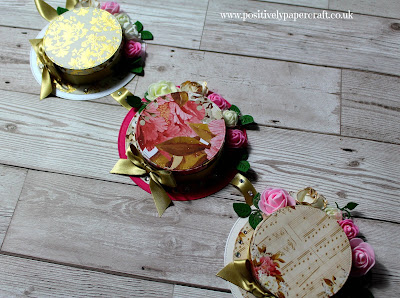
As you all know, Mothers Day will be coming up very soon & i think this would make a perfect gift. Of course you can make it for so many different occasions. I love the way it turned out & it looks so beautiful hanging on the wall.
All you have to do is follow the hat tutorial i have on my YouTube channel. Well i have 2 tutorial & they are both made in the same way. The only difference is that you don't need to make the easel part. I just made 3 Bonnets and then glued ribbon on to each hat so that you can hang it up. I made a total of 3 Bonnets. Mine were decorated with Ribbon and Flowers. This is so easy to make but yet it looks so professional. If i get a chance i will make a lovely gift box for it as a few people have asked me.
I will put the YouTube link at the end of this post. Please make sure you check it out. I will be back on Friday with another tutorial.
Bye for now
Love Ann xx
Sunday 23 February 2020
Open Book Easel Card With Or Without Dies!
Hi everyone,
Thank you for visiting my Blog today! I hope you are all having a great Weekend.
I have been wanting to make an open book card for sometime now. In my craft forum group, a few Ladies have been making them & then that reminded me that i never got round to making one. They are very simple to make & you can do it with or without dies. I hope you like the ones i have made.
The first picture above is made with the open book die set that i have. I have put the link in my Youtube video description. The paper pad is Mintay and i think i got it from https://thompsonscraftsupplies.com/. The unicorn type card is make with an edge die and the paper pad is from Hobbycraft. I have no idea if you can still get it as i bought it last year.
If you don't have an edge or border die you can still make this type of card without dies. Just follow the same sizes that i used and then you could just round the corners making it look like a Book. Easy!!!
Please find the measurements i used below in Metric & Imperial .
DIMENSIONS
CARD BASE IS 6 X 8" SCORE IN THE MIDDLE @ 4"
THEN 6 X 4"
THEN MAKE THE NEXT LAYER 5 1/2" X 3 1/2"
THEN 5 1/4" X 3 1/4"
THEN 5 X 3"
THEN 4 3/4" X 2 3/4"
FOLD THEM ALL IN THE MIDDLE CREATING YOUR 'BOOK'
OR 15.2 CM X 20.3 CM
15.2 CM X 10.2 CM
14 CM X 8.8 CM
13.3 CM X 8.2 CM
12.7 CM X 7.6 CM
12.1 CM X 6.9 CM
I will be back on Wednesday with another video :-)
Love Ann xx
Friday 21 February 2020
4 Drawer Mini Ink Pad Storage!
Hi Everyone,
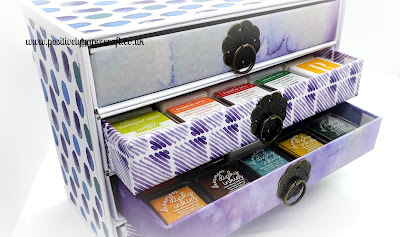
Thank you for visiting my Blog today. I am back with more craft room storage :-) I love this little project & i am super proud of myself for coming up with this! Its a 4 drawer storage unit that hold 40 mini Ink pads ( 10 in each drawer) . So adorable & simple to make. I hope you like it & will maybe give it a go.
This unit is a nice size so if you don't have a large craft area or much space it will be great. Its all made from Grey board and its super strong. The handles i got from Aliexpress last year. I will try and find the link and put it under my video in the description.
You can find all the measurements listed below in imperial and metric. This little storage unit just makes me smile when i look at it! Its so cute & i am very proud of myself!
DIMENSIONS
CHIPBOARD FOR THE DRAWS MEASURES
7 X 3"
2 PIECES MEASURING 7 X 1 1/8"
2 PIECES MEASURING 3" X 1 1/8"
YOU NEED 4 DRAWS
OR
17.8 CM X 7.6 CM
17.8 CM X 2.8 CM
7.6 CM X 2.8 CM
DRAW SLOTS X 4
CHIPBOARD MEASURES 7 1/4" X 3 1/4"
3 1/4" X 1 1/4" X 2 PIECES
OR
8.2 CM X 18.4 CM
8.2 CM X 3.1 CM
BOX UNIT
BACK PANEL MEASURES 7 3/8" X 5 1/2"
5 1/2" X 3 3/8" X 2 PIECES
7 3 /8" X 3 3/8" X 2 PIECES
OR
18.7 CM X 14 CM
14 CM X 8.5 CM
18.7 CM X 8.5 CM
YOU WILL ALSO NEED YOUR HINGES WHICH ALL MEASURE 1" WIDE AND SCORED @ 1/2" JUST CUT THEM TO MEASURE THE LENGTH YOU NEED.
Please check out my video which you can find linked below.
I will be back tomorrow with some craft goodies :-0
Love
Ann xx
Sunday 16 February 2020
12 x 12 Chipboard Paper Storage
Hi everyone!
Thank you for stopping by my Blog Today! I hope you are all having a lovely Weekend. Last night was quite bad with storm 'Dennis' but i think we got of lightly compared to some places in the UK. I hope you managed to avoid the worst of it. On the plus side its a good excuse to stay home & craft.
Today you will be pleased to see i have more craft room storage! Even better is that its for 12 x 12" papers. My idea came from the A4 magazine file that i made the other day. I new there had to be a way to make a bigger one. That is one of the reasons i bought the A3 grey board from Amazon.
I also added some little reinforcements on all 4 joining corners. For this i used a 2" circle punch. The actual length of the box is 13 1/4" because i store some of my papers in 12 x 12 plastic sheets. They have a 1" strip down the sides that has holes punched out so i new making the box 12" long would not be big enough for mine. You can store lots of papers in this & again its very strong & sturdy.
You can find all the measurements listed below in Metric & Imperial.
2 PIECES CHIPBOARD MEASURING 11 3/4" X 13 1/4"
MEASURE UP 4" AND CUT OFF DIAGONALLY TO THE TOP CORNER
OR
29.8 CM X 33.6 CM
MEASURE UP 10.2 CM
1 PIECE CHIPBOARD FOR THE BACK MEASURES 11 3/4" X 5"
OR
29.8 CM X 12.7 CM
1 PIECE CHIPBOARD FOR THE BASE MEASURES 13 1/4" X 5"
OR
33.6 CM X 12.7 CM
1 PIECE CHIPBOARD FOR THE FRONT MEASURES 4" X 5"
OR
12.7 CM X 10.2 CM
THE BLACK CARD JOINING PIECES ARE ALL 1 3/4" WIDE SCORED IN THE MIDDLE @ 7/8"
YOU NEED 4 WHICH ARE 11 3/4" LONG
4 WHICH ARE 13 1/4" LONG
4 WHICH ARE 4" LONG
6 WHICH ARE 5" LONG
2 WHICH ARE APPROX 16" LONG
OR
4 X 29.8 CM
4 X 10.2 CM
6 X 15.2 CM
2 X 40.6 CM
ALL PIECES ARE 4.4 CM WIDE & SCORED IN THE MIDDLE @ 1.9 CM
2 PIECES OF CARD FOR THE INSIDE & BOTTOM OF THE BOX MEASURING 4 7/8" X 13 1/8"
OR
12.4 CM X 33.3 CM
I hope you have enjoyed my tutorial & will give this a go. I am so happy with it and i will be definitely making another 1 or 2 for my papers.
Please check out my YouTube channel for step by step instructions and also links to the paper pad, chipboard & card etc.
I will be back on Wednesday with another tutorial.
Bye for now
Ann xx
Wednesday 12 February 2020
A4 Chipboard Paper Storage!
HI Everyone,
Welcome to my Blog & thank you for stopping by! I did promise more Craft Room storage & today that is what i have! I am so proud of this & it turned out so much better than i thought it would. Its so strong & will happily hold quite a bit of A4 card stock. Of course you don't have to keep Card stock in it, you may want to keep your Craft magazines in it or maybe even your card scraps. The choice is yours.
 |
| Very professional looking, even inside. |
 |
| Decorate your file box anyway you choose! |
 |
| I even added a beautiful fabric bow |
 |
| You could add charms like i did. |
 |
| Extra decoration added on the front makes it look so pretty. |
You will be amazed how strong this is & also how simple it is to make. As long as you have some good Chipboard/Greyboard it will be super simple & it will look amazing! How pretty would it look if you had a few of these sitting together in your craft space?? I no for a fact i will be making a few more of these. Last year i bought 2 boring white ones & they have gone in the bin since i made this.
Please find all the measurements below in metric & Imperial.
DIMENSIONS
2 PIECES OF CHIPBOARD FOR THE SIDES MEASURING 9 1/2 X 11 3/4"
OR
24.1 CM X 29.8 CM
1 PIECE CHIPBOARD MEASURING 11 3/4" X 3 3/4"
OR
29.8 CM X 9.5 CM
1 PIECE CHIPBOARD MEASURING 3 3/4" X 3 3/4"
OR
9.5 CM X 9.5 CM
1 PIECE CHIPBOARD MEASURING 3 3/4" X 9 1/2"
OR
9.5 CM X 24.1 CM
YOU WILL NEED JOINING PIECES FOR INSIDE & THE SAME AMOUNT FOR THE OUTSIDE. THEY ALL MEASURE 1 1/2" WIDE & SCORED IN THE MIDDLE @ 3/4"
OR 3.8 CM & SCORED @ 1.9 CM
YOU NEED 4 PIECES WHICH ARE 11 3/4" IN LENGTH
8 PIECES WHICH ARE 3 3/4" IN LENGTH
4 PIECES WHICH ARE 9 1/2" IN LENGTH
OR
29.8 CM X 4 PIECES
9.5 CM X 4 PIECES
24.1 CM 4 PIECES
CARD STOCK OR PAPER FOR THE INSIDE & OUTSIDE BASE OF YOUR BOX IS 3 5/8" X 9 1/2"
OR
24.1 CM X 9.2 CM
2 X PAPER FOR THE INSIDE & OUTSIDE BACK OF YOUR BOX IS 3 5/8 X 11 5/8"
OR
9.2 CM X 29.5 CM
PAPER FOR THE FRONT INSIDE & OUTSIDE OF YOUR BOX IS 3 5/8 X 3 5/8"
OR
9.2 CM X 9.2 CM
Please make sure to watch my step-by-step tutorial. I will also include the link at the end of this post.
I will be back on Friday with a cool tutorial/Technique & also more craft room storage on Sunday! ]
Bye for now
Love Ann xx
Sunday 9 February 2020
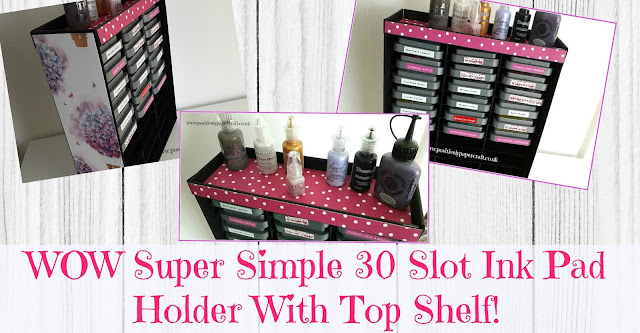
30 Slot Ink Pad Holder With Top Shelf
Hi Everyone,
I am back with more cool Craft room storage projects! Today we have a really cool Ink pad unit which holds 30 pads & also has a top shelf to store bits & bobs! How cool?? It looks very professional & it really is very simple to make. I am thrilled with how it turned out & so glad i made it. As i said in my Youtube video, this is not my idea. I saw it on Youtube & it was by Graphic45. I have put the link to the video in my Youtube description.
This Ink pad unit is designed to hold Distress Inks but you can also fit other size pads in it. You won't believe how strong & sturdy it is!! It looks fantastic on my desk & if you have room for one i really recommend giving it a go. The most time consuming part was cutting the 40 chipboard 'chips' & colouring them in with a black marker.
Below you can find the measurements in Imperial & metric. You will also find the link to my YouTube video in case you need it. If you subscribe to my channel you will get all the notifications every time i upload anyway.
MEASUREMENTS
CHIPBOARD MEASURING 9 7/8" X 11 1/4"
OR 25.1 CM X 28.6 CM
CHIPBOARD X 2 PIECES 3 1/4" X 11 1/4"
OR 28.6 CM X 8.3 CM
CHIPBOARD X 2 PIECES 3 1/4" X 9 3/4"
OR 8.3 CM X 24.8 CM
CHIPBOARD MEASURING 11 3/4" X 3/4"
OR 24.8 CM X 1.9 CM
40 X CHIPBOARD MEASURING 1" X 2 3/4"
OR
2.5 CM X 7 CM
10 X THICK CARD FOR SHELFS MEASURING 9 3/4" X 2 7/8"
OR 24.8 CM X 7.3 CM
CARD FOR INSIDE BACK MEASURES 11 1/8" X 9 3/4"
PENCIL MARK ON THE SHORT SIDE @ 3 1/4" & 6 1/2"
OR
28.3 CM X 24.8 CM
PENCIL MARK @ 8.2 CM & 16.6 CM
YOU WILL NEED CARD STRIPS OF 1 1/4" X 12" TO JOIN UP YOUR BOX & COVER THE EDGES, SOME MAYBE SHORTER THAN 12" JUST TRIM TO SIZE
PAPER TO COVER THE SIDES & BACK MEASURES 11 1/8" X 9 3/4"
2 X 11 1/8" X 3 1/4"
OR
28.3 CM X 24.8 CM
2 X 24.8 CM X 8.2 CM
Thank you for stopping by & i will be back next week with lots more tutorials.
Bye for now
Ann xx
Friday 7 February 2020
Mens Chipboard Folio/Organiser!
Hi everyone
Today i have a project that is geared towards the Men in your life. Something that i very rarely make. I think its because i don't really have any Men in my life so i tend to forget that other people do. Anyway, i am really pleased with how this turned out & its really simple to make. I made mine from old cereal boxes & its super strong.
I also made the 2 large Notebooks. They were so easy to make. The paper was printed for free online & i used some spare paper from old Notebooks that i had lying around. I just cut it to size, rounded all the corners & used my Reptile glue to seal the tops of the pages together. As i said in one of my tutorials last week, i will never buy anymore notebooks again! There is no need when you can make your own professional looking ones.
This folio organiser has lots of storage pockets & the notebooks can be replaced. I made a slot for them so you just pull them out when they are empty & slot new ones back in. My folio closes with velcro. I did try magnets but with the chipboard & thickness of everything the closure just kept popping open.
I really love this project & it would make a beautiful Gift. You can make them in any style you like. There is also plenty room if you want to add a pen slot. I hope you like it & will make one for the Man or woman in your life! I am sure they would love it.
DIMENSIONS
2 PIECES CHIPBOARD MEASURING 9 X 4 1/2"
1 PIECE MEASURING 9 X 3/4"
OR
22.9 CM X 11.4 CM & 22.9 CM X 1.9 CM
12 X 11" CARD STOCK FOR THE COVER
OR
30.5 CM X 27.9 CM
1 PIECE PATTERNED PAPER FOR THE INSIDE 9 1/2" X 8 3/4"
OR
24.1 CM X 22.2 CM
2 PIECES CARD FOR THE PAGES 4 1/2" X 8 3/4" SCORE THE SHORT SIDE @ 1/4"
OR
11.4 CM X 22.2 CM SCORE @ 0.6 CM
2 PIECES CARD FOR NOTEBOOK SLOTS 5 1/2" X 3 7/8"
OR
14 CM X 9.8 CM
CARD STOCK FRONT POCKET MEASURES 5 X 6 1/2
SCORE 3 SIDES @ 1/2"
SMALLER FRONT POCKET 5 X 4"
SCORE 3 SIDES @ 1/2"
OR
12.7 CM X 16.5 CM
12.7 CM X 10.2 CM
SCORE 3 SIDES ON BOTH POCKETS @ 1.2 CM
POCKET WITH CALENDAR MEASURES 4 1/2" X 5"
SCORE 3 SIDES @ 1/2"
OR
11.4 CM X 12.7 CM
SCORE 3 SIDES @ 1.2 CM
LARGE POCKET MEASURES 9 X 4 1/4"
SCORE 3 SIDES @ 1/2"
OR
22.9 CM X 10.8 CM
SCORE 3 SIDES @ 1.2 CM
LARGE POCKET MEASURES 9 X 4 1/2"
SCORE LONG SIDE & SHORT @ 1/2"
OR
22.9 CM X 11.4 CM
SCORE @ 1.2 CM
PATTERNED PAPER X 2 FOR THE FRONT 4 1/4 X 8 3/4"
SPINE PAPER 5/8" X 8 3/4"
OR
22.2 CM X 10.8 CM
SPINE 22.2 CM X 1.5 CM
Please find the link to my video at the end of this post. I will be back again tomorrow with another video.
Love Ann xx
Wednesday 5 February 2020
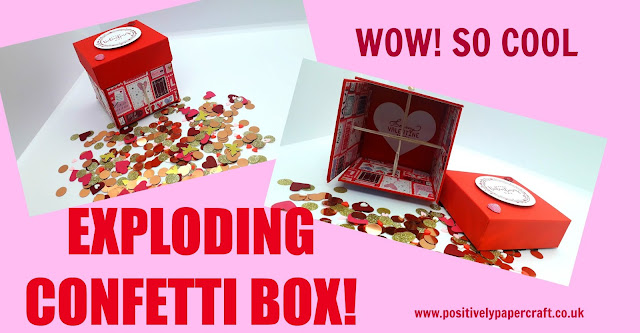
Amazing EXPLODING Confetti Box Tutorial
Hi Everyone!
Welcome to my Blog & thank you for paying me a visit! Today i have the most amazing & really cool exploding box for you. When i say 'exploding' i really mean it! It will definitely give the recipient a very big surprise when they take the lid off! The ideas is that you fill the box with confetti, sequins & even small sweets if you like. When the lid is taken off the box pops right up & all the contents jump all over the place! I love it.
I came across a few of these boxes on youtube but the tutorial i watched was from someone called 'The Creative Guy' I have linked his video in my Youtube description. I did not follow his tutorial (sizes etc) I just made up my own sizes & made my box from layered card rather than cardboard. It really is super simple to make & all you need is Card, paper, 4 small elastic bands and confetti, sequins etc.
I made my box in a Valentines theme but of course you can make yours anyway you like. It would be fantastic for a kids party or just a regular Birthday etc. I really think you will love this box if you give it a try.
You can find all the measurements below in metric & imperial. At the end of this post i will also put the link to my Youtube Tutorial. I explain step by step how to make this box.
MEASUREMENTS
THE SIDES OF THE BOX MEASURE 3 X 3" I LAYERED 4 PIECES OF CARD TOGETHER TO MAKE ONE SIDE. IF YOU DO THIS YOU WILL NEED 18 PIECES OF 3 X 3" 16 PIECES FOR THE SIDES & 2 PIECES FOR THE BOX BASE.
OR 7.6 CM X 7.6 CM
8 PIECES OF PATTERNED PAPER FOR THE INSIDE & OUTSIDE OF THE BOX MEASURING 2 7/8" X 2 7/8"
OR 7.3 CM X 7.3 CM
CARD FOR THE LID MEASURES 7 1/8" X 7 1/8"
SCORE ALL 4 SIDES @ 1" & 2"
OR 18.1 CM X 18.1 CM
SCORE ALL 4 SIDES @ 2.5 CM & 5 CM
I will be back again on Friday with another tutorial. I can tell you that it will be something for the Guys!!
Bye for now
Ann xx
Sunday 2 February 2020
EASY 12 x 12" Paper Storage Tutorial
Hi Everyone,
Thank you for stopping by my Blog! Today i have a tutorial on how i made this 12 x 12" scrapbook paper storage unit. I have been asked so many times if i could come up with something to store your 12 x 12" papers in. I decided the easiest thing to use would be Pizza boxes. I often use them for my monthly craft boxes so always have a supply of them. I will also put the link for them at the end of this post & also on my you tube video.
I just want to say that this tutorial was very hard to film. As you can imagine the boxes are so large & took up all of my desk. I just hope you can understand how to do it. Its really quite simple & you can also add more boxes if you would like yours bigger. Mine had 5 boxes & it turned out really strong. Mine is being used for my 12 x 12" card stock.
I am pretty pleased with the end result & all you really need is card stock and pizza boxes to make it.
I will list all the measurements below in imperial & metric & also the link to my Youtube video.
DIMENSIONS
5 PIECES OF CARD MEASURING 12 X 2"
SCORE ON THE SHORT SIDE @ 1" THESE ARE TO COVER THE TOP SECTIONS OF YOUR PIZZA BOX
OR 5 PIECES MEASURING 30.5 CM X 5 CM
SCORE @ 2.5 CM
5 PIECES OF 12 X 12
SCORE @ 2"
OR 5 PIECES MEASURING 30.5 X 30.5 CM
SCORE @ 5 CM
10 PIECES OF CARD MEASURING 12 X 1 3/4"
SCORE ON THE LONG SIDE @ 2"
OR 10 PIECES MEASURING 30.5 CM X 4.4 CM
SCORE ON THE LONG SIDE @ 5 CM
YOU WILL ALSO NEED 2 PIECES OF 12 X 12 CHIPBOARD OR THICK CARD TO COVER THE SIDES OF YOUR STACKED PIZZA BOXES
OR 30.5 CM X 30.5 CM
YOU ALSO NEED 4 PIECES OF 12 X 12 PATTERNED PAPER TO DECORATE YOUR BOX
OR 30.5 CM 30.5 CM
Thank you & i will be back next week with some more great videos, including one for the gents!
Love Ann xx
LINK FOR PIZZA BOXES https://www.ebay.co.uk/itm/Plain-Pizza-Boxes-Takeaway-Pizza-Box-Strong-Quality-Postal-Boxes-7-20-Inch/182080337227?var=483210885209&hash=item2a64d5754b:m:mZCrZuK50aOzvEgTPwINfIg
Subscribe to:
Posts (Atom)
-
Hi Everyone, I am back with more cool Craft room storage projects! Today we have a really cool Ink pad unit which holds 30 pads & a...
-
Hi Everyone, Today i have a gorgeous mini album for you. One of the great things about this album is that it requires NO chipboard! Of...
-
Hi everyone, As you will know i have not posted on here for a very long time. The reason being as i have a new website so i will know longe...


