Hello, my name is Ann Melvin. I am a paper craft designer, Blogger, You-tuber & a total craft addict! My blog is full of great tutorials & inspiration. I post new content at least 3-5 times per week.
Tuesday 31 December 2019
Double M Fold Card Tutorial
Hi everyone,
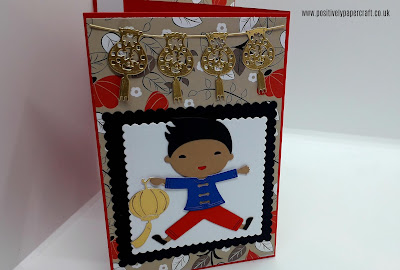
Welcome to my Blog. Thank you for popping by to see Today's project! It happens to be a card that i have never come across before! It's called a double M fold card. I saw it on a Blog called Beccys Place. Here is the link https://beccysplace.blogspot.com/ Please check it out as she has so many lovely cards on there and just about every card that has ever been made! This one stood out to me and its really easy to make.
I decided to make mine a sort of Chinese new year card. I love the red and Gold colours and the adorable little Boy on the front. It is a die from Alinacrafts as is the Chinese Lanterns and the gorgeous 'Happiness' die in the middle of the card. You can find the links all in the description of my Youtube video.
Of course you can make your card in any style you like. The great thing is that it folds totally flat for postage. To make my 2 cuts in the card i used a ruler and a craft knife. I hope you like it and will give one a try yourself.
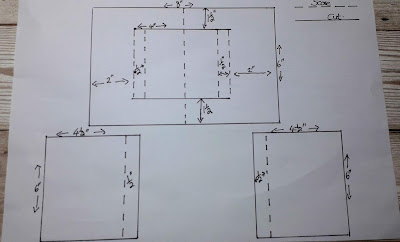
Above you can see a picture i took of the template i drew for you. I just thought it may help you all out. If you visit the Lady's blog you will also find a template/Picture on there to. Below you can find all the measurements in imperial and metric.
MEASUREMENTS
CARD STOCK MEASURING 8" X 6" OR 15.2 CM X 20.3 CM
SCORE THE MIDDLE @ 4" oR 10.1 CM
CUT AS SHOWN IN THE TUTORIAL AND YOU CAN ALSO USE THE TEMPLATE ABOVE.
2 PIECES OF CARD MEASURING 4 1/2" X 6" OR 11.4 CM X 15.2 CM
SCORE THE SHORT SIDE @ 1/2" OR 1.2 CM DO THIS TO BOTH PIECES
3 PIECES OF PATTERNED PAPER MEASURING 3 7/8" X 5 7/8" OR 9.8 CM X 14.9 CM
1 PIECE OF WHITE CARD MEASURING THE SAME, THIS IS FOR THE BACK TO STAMP OR WRITE A SENTIMENT.
Please find my Youtube video link at the end of this post.
Bye for now!
Love Ann xx
Friday 27 December 2019
Magic Cube Card/Box So Easy To Make
Hi Everyone,
I hope you had a lovely Christmas! It seems to of gone so quick! This time next week it will be new year. I have some great stuff in store for you and also some news to tell you that is just AMAZING!! Some of you who follow me may already no but lots of you are not aware yet. So keep your eyes peeled.
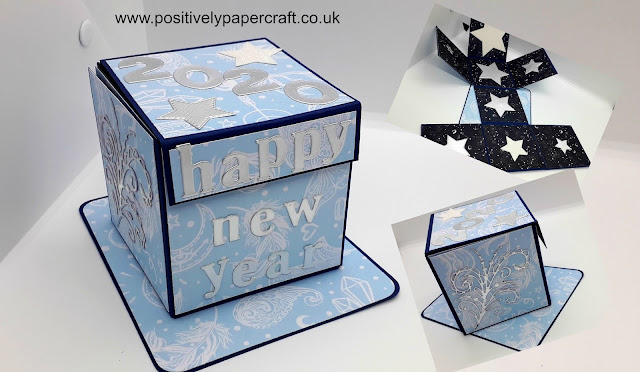
So today i have a really cool card/box for you. Its called a magic cube and its a very novel little project. I decorated mine in a 'new year' theme but as always you can choose whatever theme you like. Its so easy to make and you only require card, paper, magnets and a brad.
I will list all the measurements below in imperial and metric. Please make sure you check out my Youtube tutorial for full instructions.
As i said in the video this is not my idea, i have seen a few people make these but the person i got mine from is 'Love for crafts' on Youtube. You can find the link to her channel in my video description.
MEASUREMENTS
6 PIECES OF CARD MEASURING 3 1/2" X 4 5/16" OR 9 CM X 11 CM
SCORE THE LONG SIDE @ 3/4" OR 2 CM ON ALL PIECES
1 PIECE OF CARD MEASURING 3 1/2" X 3 1/2 OR 9 CM
1 PIECE CARD MEASURING 3 1/2" X 5 1/2" OR 9 CM X 14 CM
SCORE THE LONG SIDE @ 3/4" & 4 1/2 OR 2 CM & 11.5 CM
DESIGNER PAPER MEASURES 3 3/8" X 4 1/2" OR 8.5 CM X 11.4 CM
BASE CARD MEASURES 6" X 5" OR 15.2 CM X 12.7 CM
DESIGNER PAPER IS 1/8" SMALLER
Thank you for stopping by and i will be back very soon.
Happy New Year
Love
Ann xx
Monday 23 December 2019
Make your own Mug/Cup Gift Box
Hi Everyone,
Welcome to my Blog. I just want to say that this will be my last post before Christmas! I just want to wish all my followers and very Merry Christmas. I hope you have a fantastic day. I will be back before he new year. Its surreal to think it will be Christmas in a couple of days.
Today i wanted to share this large gift box i made. I had bought a beautiful Mug for my Mam for Christmas but it didn't come with a box. I wanted to create my own as i think it would be a much better way to gift it. Also it would protect the Mug from any chips etc.
I also created a kind of slot in holder so that the Mug can sit in the bottom of the box. This just stops the Mug from rolling around in the box & it also gives a more professional look to the box. Its really easy to make & i was so pleased with the finished project.
I decorated the top of my box with my favourite Poinsettia flowers. They are from simply made crafts & you can find the link in the description of my YouTube video. Please check out the video, you can find the link at the end of this post. Below you will see the measurements in Metric & Imperial.
MEASUREMENTS
CARD STOCK FOR THE BOX MEASURES 11 X 12" YOU NEED 2 PIECES
OR 27.9 CM X 30.4 CM
SCORE BOTH PIECES THE SAME @ 6" , 10 1/2" & 11" ON THE SHORT SIDE
OR 15.2 CM, 26.6 CM & 27.9 CM
SCORE ON THE LONG SIDE @ 1/2",, 5" & 9 1/2"
OR 1.2 CM, 12.7 CM & 24.1 CM
BASE FOR THE CUP TO SIT IN MEASURES 7" X 5 1/2"
OR 17.7 CM X 13.9 CM
SCORE ALL 4 SIDES @ 1/2" OR 1.2 CM
DESIGNER PAPER MEASURES 5 7/8" X 4 3/8" YOU NEED 3 PIECES
OR 11.11 CM X 14.9 CM
2 PIECES MEASURING 4 3/8" X 4 3/8" OR 11.11 CM X 11.11 CM
MY CIRCLE DIE FOR THE CUP BASE MEASURED 3 1/4"
Merry Christmas everyone!!
Love Ann xx
Sunday 22 December 2019
Easy Sloped Top Handbag (No Die needed)
Hi Everyone,
Thank you for popping by :-) Today i have a very simple Handbag that is so sweet & also quite realistic looking! This would be a fantastic gift box which of course would be kept by the recipient & maybe put on display somewhere. Its not hard to make and you only need some scrapbook paper, Card stock & some Brads. I also used a white gel pen to create some faux stitching on my Handbag.
I chose to make my bag from Double sided paper but you could also make it from Card stock if you wish. The choice is yours. I think it would look beautiful either way. If you make it from Card stock you could maybe try some heat embossing on it. The straps and zip effect etc are all made from card stock. I used a 12 x 12" paper pad that i bought from 'The Works'.
I also made a really cute Mirror tag using some silver Mirri card. The back of it is made from white card stock so you can write a message if you wish. I chose some layering dies to make mine, any will do. You could use circle dies if you have them.
I will list all the measurements below & please make sure to check out my Youtube video which will show you how to put the Bag together. You can find the video link at the end of this post.
DIMENSIONS
DESIGNER PAPER FOR THE BAG MEASURES 12 X 8 1/2" OR 30.4 CM X 21.5 CM
SCORE THE LONG SIDE @ 2 1/2" ON EACH END OR 6.3 CM
SCORE THE SHORT SIDE @ 2 1/2" ON WHAT WOULD BE THE BOTTOM OF YOUR BAG (IF YOU HAVE A PATTERN IN YOUR PAPER) OR 6.3 CM
THE 2ND PIECE MEASURES 8" X 8 1/2" OR 20.3 CM X 21.5 CM
SCORE THE LONG SIDE @ 1/2" ON EACH SIDE OR 1.2 CM
SCORE THE SHORT SIDE @ 2 1/2" OR 6.3 CM
2 PIECES OF CARD FOR THE HANDLE MEASURE 11 3/4" X 1" OR 29.8 CM X 2.5 CM
2 PIECES OF CARD FOR THE DECORATIVE SIDES MEASURE 6 1/2 X 2" OR 16.5 CM X 5 CM
PIECE FOR THE FAUX ZIP MEASURES 1" X 5 1/2" OR 2.5 CM X 13.9 CM
CUT IN THE MIDDLE @ 1/2" ON THE SHORT SIDE OR 1.2 CM
I will be back again on Monday with another tutorial.
Bye for now
Ann xx
Thank you
Love Ann xx
Thursday 19 December 2019
Beautiful Easel 'Hat' Style card With Matching Gift Box
Hi Everyone,
Welcome to my Blog & thank you for stopping by. You may of noticed that i have not been around for the last few weeks. I took a break from Youtube & my Blog as i have not been to well again & i just really needed a rest from it all. Anyway, i am back now & i have some fantastic projects lined up for you. I really hope you enjoy them & please feel free to share my posts/videos etc.
So to kick it off i have this beautiful Easel style hat card that also has a matching presentation box. Firstly i want to say that this project popped up on my pinterest feed. There was no tutorial however, just a couple of pictures. As soon as i saw it i new i had to try and make it. The easel card is very similar to the one i found of Pinterest but the presentation box i made was very different from the original. So in principal this project is not my idea but i made up my own tutorial. I shall put the link at the end of this post for the original creator. Credit where credit is due!!
This really is a very simple project to make and definitely a 'keepsake' card. I also had the idea of making the presentation box a larger 'Hat' box but to be honest i hate making circular boxes! I just find them a pain & can be very difficult to put together. So with that being said i just opted for a square gift box.
I will list the sizes of the circles i used and also the measurements for the gift box. Just bare in mind that if you use different size circles to me, your box may not fit your card.
I hope you have enjoyed my Project today and maybe you will try one for yourself. It really is so beautiful and quite unique.
MEASUREMENTS
GIFT BOX MEASUREMENTS IN IMPERIAL & METRIC
BOX BASE MEASURES 12 X 12" OR 30.4 CM X 30.4 CM
SCORE AL 4 SIDES @ 1 1/2" & 3" OR 3.8 CM & 7.6 CM
BOX LID MEASURES 8 1/8" X 8 1/8" OR 20.6 CM X 20.6 CM
SCORE ALL 4 SIDES @ 1" OR 5 CM
DESIGNER PAPER FOR THE TOP OF THE BOX 5 3/4" SQUARE OR 14.6 CM SQUARE
DESIGNER PAPER FOR THE INSIDE OF THE BOX 5 7/8" SQUARE OR 14.9 CM
THE CIRCLES I USED FOR MY CARD BASE WERE 5 1/4" OR 13.3 CM
Here is the link for the original creator of this Hat/Bonnet style card http://zielonaliszka.blogspot.com/2014/10/cos-innego.html
Bye for now
Love ann xx
Tuesday 17 December 2019
3 Beautiful Cards-1 Stamp set
Hi Everyone,
Thank you for popping over to my Blog! Today i have an 'extra' Tutorial for you. I was recently sent this beautiful stamp set from Craftstash with the aim to provide examples for Hochanda etc. I fell in love with it straightaway!! Its so beautiful and just the kind of stamps i prefer. You can also purchase it with a matching stencil. It makes colouring the Rose in so easy!!
I thought i would make 3 cards with the stamp set. I hope you like them and i hope i have inspired you to make something similar.
The card in the picture above is my favourite!! I love how it turned out and it was so easy to make. I used the stencil to colour in the bottom half of the Rose. I used Distress Oxide inks in Broken China & Tumbled Glass. The measurements for the card are below:
CARD BASE MEASURES 11 3/4" X 5" OR 29.8 CM X 12.7 CM
SCORE IN THE MIDDLE @ 5 7/8" OR 14.9 CM
BLACK MAT LAYER MEASURES 4 7/8" X 5 3/4" OR 12.3 CM X 14.6 CM
WHITE MAT LAYER MEASURES 4 3/4" X 5 7/8" OR 12 CM X 14.9 CM
SMALLER BLACK MAT LAYER MEASURES 4 1/4" X 3 7/8" OR 10.7 CM X 9.8 CM
WHITE LAYER MEASURES 3 3/4" X 4 1/8" OR 9.5 CM X 10.4 CM
The card in the above picture was so easy to make and i think it looks very effective. I heat embossed the Rose twice with a beautiful pink embossing powder from Sizzix. I then fussy cut them out. The sentiment is also from the same stamp set.
MEASUREMENTS
PINK CARD BASE MEASURING 4 3/4" X 11 3/4" OR 12 CM X 29.8 CM
SCORE IN THE MIDDLE @ 5 7/8" OR 14.9 CM
WHITE LAYER MEASURING 4 5/8" X 5 3/4" OR 11.7 CM X 14.6 CM
The last card is so pretty and the Rose is heat embossed on vellum. I coloured it in from behind and i used alcohol markers by Arteza. The embossing folder is an Apple blossom one from Craftstash. I will put the links of the products i used at the end of this post.
MEASUREMENTS
CARD BASE IS 6 X 6" OR 15.2 CM X 15.2 CM
BLUE CENTURA PEARL CARD MEASURES 5 3/4" X 5 3/4" OR 14.6 CM X 14.6 CM
I hope you have enjoyed my cards!! Please find all the links below:
Embossing Folder
Rose Stamp & Stencil
Bye for now
Ann xx
Monday 16 December 2019
Easy Lip Balm Shadow Box Gift Box
Hi Everyone,
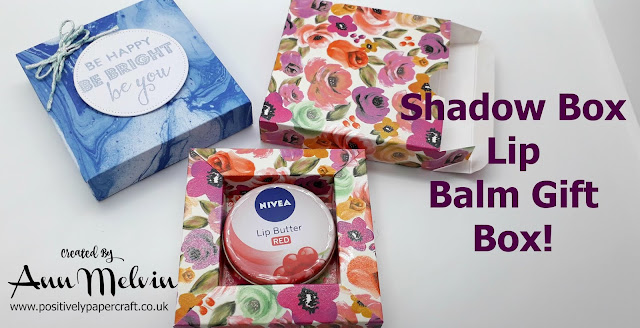
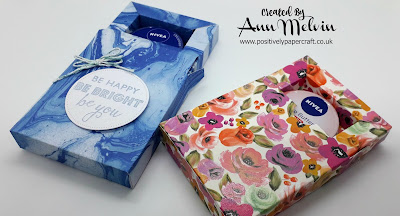
Welcome to my Blog. I hope you are all well & enjoying my tutorials :-) Today i have the most adorable little shadow box for you! I designed this to hold a Nivea Lip Butter Tin. It fits perfectly & i even made a little box for the shadow box to slip into! Basically this makes a beautiful & inexpensive gift. You can co-ordinate the colours so that your card/paper matches your Lip butter tin. Its so easy to make & also looks very professional.
 |
| I made the box blue to match my Lip Butter! |
 |
| This make fantastic gifts! |
With this project you can make it from card Stock or scrapbook paper. I went for paper as i wanted them to be nice & colourful. I decided to make the gift box matching but you could do that in a different pattern if you wish. Anyone would be thrilled to receive this! It would be a perfect Teacher gift & i would think they would do very well at Craft Fairs.
I also thought about cutting out a little window in the gift box so that you can see the Lip Butter inside. You could put some acetate behind the window so that the Lip butter doesn't fall out. When i make another i think i will try it. On the front of the Blue Box i i stamped & heat embossed a sentiment & then added a twine bow.
MEASUREMENTS
DESIGNER PAPER FOR THE SHADOW BOX MEASURES 8 3/8" X 8 3/8"
OR 21.2 CM X 21.2 CM
SCORE ALL 4 SIDES @ 5/8", 1 1/4", 1 7/8" & 2 1/2"
CM MEASUREMENTS 1.6 CM, 3.2 CM, 4.8 CM & 6.3 CM
IF YOU WANT A DIFFERENT PIECE OF PAPER OR CARD IN THE MIDDLE IT NEEDS TO MEASURE 2 1/8" X 2 1/8" OR 5.3 CM X 5.3 CM
DESIGNER PAPER FOR THE GIFT BOX MEASURES
5 1/2" X 8 5/8" OR 14 CM X 22 CM
SCORE THE LONG SIDE @ 3 3/8", 4 1/8", 7 1/2" & 8 1/4
OR 8.5 CM, 10.4 CM, 19 CM & 21 CM
SCORE THE SHORT SIDE @ 3/4", 4 1/4" & 5"
OR 1.9 CM, 10.8 CM & 12.7 CM
Please check out my YouTube video for full instructions. You can find the link at the bottom of this blog post.
Until next time...
Love Ann xx
Sunday 15 December 2019
Unusual Top Wine Gift Box
Hi Everyone,
Thank you for popping over to my Blog today. I hope you are well and looking forward to Christmas!!
I have been a bit absent from Youtube lately as i have been anaemic again and also just taking a bit of a well earned rest! In the 4 years i have been doing this i have very rarely took a break. Anyway i am back now and have some fantastic projects lined up for you.
I am kicking it off with this gorgeous and very easy Fancy top gift box. I made mine to hold a small bottle of Wine ( 18.7 CL) This is perfect for an inexpensive Gift and looks so cool!. You could of course use it to gift Hand Cream, Shower Gel etc, whatever you prefer.
I came about this fancy closure by complete accident lol. I was making a box i made a couple of years ago called a Diamond top box. While i was making the tutorial i happened to make the fold wrong and came about this fold! So glad i did as i love it! I hope you do to.
Make sure you check out my Youtube tutorial for full instructions on how i made this box. I have also slightly changed the way that i do my videos. I have now bought myself i MIC and at the moment i am doing voice overs. I am finding that i much prefer it and also its making my videos shorter as it cuts out the need for unnecessary bits. It seems like people are very busy and don't really have time to watch 25/30 min videos, neither do i lol. My aim is to keep my videos to around 15 mins or less. I hope you prefer this way also.
MEASUREMENTS
BLACK CARD MEASURING 11 3/4" X 9 1/2" OR 29.8 CM X 24.1 CM
SCORE THE LONG SIDE @ 2 1/4" & 10 1/4" OR 5.7 CM X 26 CM
SCORE THE SHORT SIDE @ 2 1/4" , 4 1/2", 6 3/4" & 9" OR 5.7 CM, 11.4 CM, 17.1 CM & 22.8 CM
DESIGNER PAPER
4 PIECES MEASURING 2" X 7 3/4" OR 5 CM X 19.6 CM
4 PIECES MEASURING 2 X 2" CUT THESE INTO 4 TRIANGLES OR 5 CM X 5 CM
Thank you again for stopping by and i will put the video link below.
I will be back again tomorrow with another project!!
Bye for now
Love Ann xx
Subscribe to:
Posts (Atom)
-
Hi Everyone, I am back with more cool Craft room storage projects! Today we have a really cool Ink pad unit which holds 30 pads & a...
-
Hi Everyone, Today i have a gorgeous mini album for you. One of the great things about this album is that it requires NO chipboard! Of...
-
Hi everyone, As you will know i have not posted on here for a very long time. The reason being as i have a new website so i will know longe...

