Wednesday, 29 May 2019

NO Chipboard EASY Mini Album (featuring Alinacraft products)


Hi Everyone,

Today i have a gorgeous mini album for you. One of the great things about this album is that it requires NO chipboard! Of course you can make it with chipboard if you prefer. The choice is yours. The other great thing is that the pages are made using cards. The album you see in the picture is made using 6 x 6" cards. I am thrilled how this turned out and you can make it any size, depending on what size cards you have.


As i mentioned in my Youtube video, i can not take credit for this Album. I came across it on a channel called Dawns inspirations. . You can find the link to her channel in my Youtube video description. I new as soon as i saw it i had to make one! I am so glad i did.


To make my photo mats i used the Postage stamp dies from Alinacraft store. If you go to my Youtube video you will find all the product links in the description.

DIMENSIONS

12 CARDS MEASURING 6 X 6"

CUT ONE OF THE SIDES DOWN BY 2" DO THIS ON ALL CARDS

12 PIECES OF CARD MEASURING 6 X 2 1/2"

2 X CARD FOR THE COVER BOTH MEASURING 6 X 6 1/8"

1 X CARD FOR THE SPINE MEASURING 6 X 2 3/4" 

SCORE BOTH ENDS @ 1/2"

1 X CARD MEASURING 2 1/2" X 6"

1 X CARD MEASURING 2 X 6"

1 X CARD MEASURING 1/2" X 6"

SCORE ALL 3 PIECES @ 1/2" ON BOTH SIDES

DSP FOR THE COVER MEASURES 5 7/8" X 6"   X 2 PIECES

DSP FOR SPINE MEASURES 5 7/8" X 2 1/8"

DSP FOR PAGES/CARDS MEASURE 5 5/8" X 3 3/4"   X 2 

DSP FOR PAGES/CARDS MEASURES 5 5/8" X 2 3/8"

Please make sure to check out my Youtube tutorial for full instructions. You can find the link at the end of this post.

Until Friday......

Bye for now xx


Sunday, 26 May 2019

Easy Paper Handbag (Featuring BeeBee Craft Products)

#positivelypapercraft


Hi Crafter's!

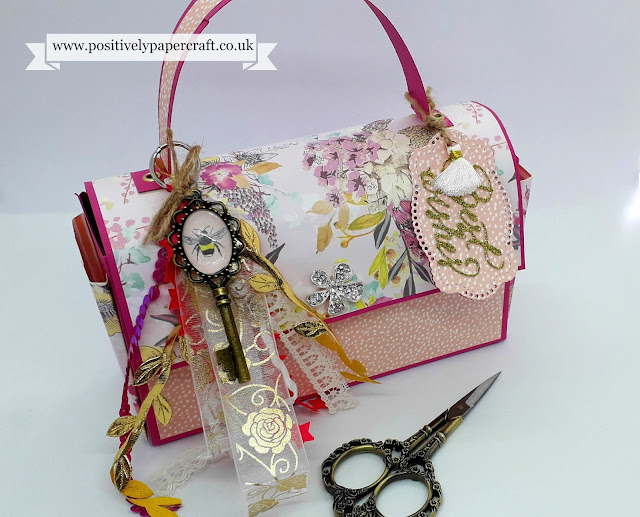
I am back with a gorgeous paper Handbag tutorial. I am so happy with the finished project and i think this Bag is so sweet. Its also very simple to make and its all constructed from card and paper. Who wouldn't love to receive this??? Its also a very good size and has 2 sweet little pockets on the side and also a pocket on the back. I think its gorgeous :-)


If you watched my BeeBee Craft haul Video the other day, i said i would show you how i make the Cabochon charms and also some of the other products in use. I love the key Cabochon charms they sent me, i chose a gorgeous little Bumble Bee for mine. If you watch the tutorial for this handbag, i show you how i make them. I also used one of the gorgeous little Tassels and also the word 'Best Wishes' which you can see on the gift tag.
You can check out BeeBee Craft HERE

I really hope you will give this Bag a try, it really is beautiful and would be perfect to fill with gifts for someones Birthday etc.
Below you will find all the dimensions for the Bag.

DIMENSIONS

2 X CARDSTOCK MEASURING 11 1/2" X 6 1/4"

SCORE BOTH PIECES THE SAME @ 2 1/4" & 9 1/4" ON THE LONG SIDE & 2 1/4" ON THE SHORT SIDE

2 X DESIGNER PAPER FOR THE FRONT & BACK OF THE BAG MEASURE 6 3/4" X 3 3/4"

CARDSTOCK FOR THE FLAP CLOSURE MEASURES 5 1/4" X 7"

DESIGNER PAPER FOR THE FLAP MEASURES 5" X 6 7/8"

CARDSTOCK FOR THE HANDLE MEASURES 9" X 3/4"

DESIGNER PAPER FOR THE HANDLE MEASURES 1/2" X 8 3/4"

2 X DESIGNER PAPER FOR THE POCKETS MEASURE 3 3/4" X 3" 

SCORE THE SHORT SIDE @ 1/2" ON BOTH ENDS

SCORE THE LONG SIDE @ 1/2"

You can also find the link for the Tutorial at the end of this post.

Thank you for stopping by and i will be back again very soon.

Love
Ann xxx


Thursday, 23 May 2019

Gorgeous Wall Plaque With Gift Box (Featuring KSCRAFT Dies)

Positiveltpapercraft handmade gift box


Hi Everyone,

I have not posted on my Blog for so long! To tell you the truth i was going to delete it as people do not seem to visit it much. Plus i have to be honest, i hate blogging lol. I have decided to keep it going for a while and see how things go. I will post every time i do a YouTube tutorial so i can write down the measurements etc.

So today i have the most gorgeous keepsake gift, i wall plaque which i also made a matching gift box for it. This turned out beautiful and i am so thrilled with it. It would make perfect gift for so many different occasions or to just hang it on your own wall!!

I made this plaque from chipboard but if you don't have any you can use a cereal box or some thick card, you could glue a few sheets together. I got my chipboard from the back of a paper pad. I made a few of these so i will put all the photos below.


All of the dies i used in this tutorial are from KSCRAFT on Aliexpress. They were all part of my last Design Team package. I love there dies and they have there own designers so they are not copied from other companies. Here is the link to there store: https://kscraftdiys.aliexpress.com/store/230571?spm=0.8937474.0.0.606d2e0ebZ9ZQy

DIMENSIONS

CHIPBOARD MEASURES 8" X 6 1/4"  MARK THE BOTTOM AT 3 1/8" AND THE SIDES @ 2", THIS WILL GIVE YOU THE MARKS TO DRAW YOUR CUT LINE.

PAPER MEASURES 10" X 8 1/4" 

CARD FOR THE BOX BASE MEASURES 8 1/2" x 11"
SCORE ALL 4 SIDES @ 1"

CARD FOR BOX LID MEASURES 8 5/8" X 11 1/8"
SCORE ALL 4 SIDES @ 1/2" & 1"

You can also check out my Youtube tutorial. I will put the link at the end of this post.

Until Friday!!

Love
Ann


Year End Clear out!! Grab Some Bargains